At present, taking video with camera is becoming more and more popular, it’s not the final step, get the video, we can do more on it, for example: Editing the family video by ourselves and send it as a precious gift to your lover, upload and share the video with friends from Youtube, Facebook, play the video on various devices and media players. We all want to be the master of the video and make a wonderful video which can attract more views.
Whether you’re want to be a professional or an amateur video editor, you need to learn about several video editing skills, including video shoot, video transferring, basic video editing, vide export and uploading completed videos to websites. this post is ready for you, especially for video editing beginner.
Part 1: The Video Shoot
Before other steps, how to shoot a video is the first step. Whatever you take the video form a phone or the camera, you can pay attention to the following tips:
Degree: Taking the video with iPhone or camera, the video degrees is important, you don’t take the video from one single degree which is too boring. You can try to use shots that are looking at the subject from at least a difference of 45 degrees. Remember to very the degrees and take the video with more interesting angles
Frame rate: Frame rate represents the frames number thet a camera can record in a second. It’s often expressed “in frames per second” (fps). Higher numbers of fps usually means the higher video quality, clearer and more detailed images. Usually, most digital cameras have frame rates between 24 and 30 fps, you can adjust the frame to higher.
Lighting: When you take the video outside, the light is hard to be controled, strong or weak light all will affect the video effects, you need to adjust the light on phone or your camera. When you take the video at home, you can take ful use of the filters, diffusers, and gels which can change the color and direction of light.
NOTE: If you are a PC game player and capture the video from the game, you don’t worry about above information, but you need to choose a powerful video capture software which can help you to record the wonderful screen moment.
Part 2: The Video Transferring
Before we start to edit the video, video transferring is necessary, you need to transfer the video from Phone or Camera to the PC for NLE software. Usually, we need to connect the devices to PC and copy the video to yout computer, or you can insert the storage devices to PC, like: SD card, USB, etc.
- Memory cards: When you take the video with a camera which has a memory card, then you can transfer film by inserting the card into the your computer by a memory card adaptor.
- USB port: Many digital cameras come with USB cords. Plug the cord into your camera and computer to establish a connection that lets you transfer information quickly.
- FireWire: Older digital cameras may use FireWire cables, also known as iLink and IEEE 1394 cables. Modern computers usually lack a FireWire port, though. If your camera uses FireWire, then you may need an adaptor.
Part 3: The Video Editing
Come to the video editing, you can choose to edit video by online video editor or install a professional video editor on PC. If you still can’t find a dream online video editor or a professional, NLE software, following information maybe helpful for you.
Top 3 Online Video Editor
Youtube Video Editor: Youtube is not a famous video share websites, also allows users to edit the video for better uploading and attracts more views. You need to create your own Youtube account which can help you upload and manage your video easily. You can enter your own video channel and drag or add the video or audio to the video editing area.
WeVideo: Which is a shared online video creation tool. You can use the free version or buy the official version, of course, the official versio is more powerful than free version. Good news is that WeVideo is the google drive app, you can edit the video direcly without taking up much space on your computer
Wideo: It is also an excellent, great site for creating regular videos. Best of all, Wideo allows you to use the different elements as many times as you want to create your video and unlike some websites, you are not limited to using stock elements (text, cartoons, drawings, and images) and components.
Top 3 Professional Video Editor
iMovie: The iMovie video editing software is simple to use and with some advanced features that’ll appeal to intermediate filmmakers. With this software, you can easily arrange clips on a timeline, crop frames, and add transitions between scenes. It’s very powerful considering it’s free.
Final Cut Pro: FCP is the most appealing to professional video editors. The software is compatible with most video formats. Most professional video editor like this software, it provides the color correction, video transitions, and audio filters for a professional product.
Adobe Premiere Elements: This affordable editing software attracts many users cue to the resonable price: less than $100. But this software can gives provide users a full suite of video and audio editing features. You can add video effects, transitions, subtitles, and more. You can even use it to make a DVD copy of your movie.
Hot Search: iMovie 13 | Tivo to iMovie | Blu-ray to iMovie | Video to FCP | iPhone Video to FCP | 4K to FCP |
Part 4: The Video Export
After the video editing, you need to output the video, this step looks simple, if you can’t output the right video format, you may meet many unnecessary troubles, especially when you want to upload the video to some online video share websites or apps. because different share platform all limit the video format, like the below table: Popular video share websites.
|
Type |
Youtube | Vimeo | |
|
Resolution |
2160p(4K) 1440p(2K) 1080p 720p 480p 360p |
4K 2K 1080p 720p SD |
4K 2K 1080p 720p |
|
Frame Rate |
<60fps | <60fps | <30 fps |
| Aspect Ratio | 16:9, 4:3 | 16:9 | |
|
Bitrate |
1 Mbps-68 Mbps(base on different resolution) | 1 Mbps-12 Mbps(base on different resolution) |
1 Mbps-20 Mbps(base on different resolution) |
|
Best Video Format |
AVI, 3GPP, MOV, MPEG or .MPG, FLV, M4V (H.264), WMV,WEBM (HTML5) | H.264, Apple ProRes 422 (HQ) | H.264(AAC).MOV, MP4 |
| Video Size | <2GB | <5GB | <4GB |
|
Video Time |
<15 minutes | N/A | <20 minutes |
Sometimes, users can’t upload the video to above websites due to various video parametres,thankfully, a video converter can help you to solve the video format compatibility issue, i highly recommend you to use Pavtube Video Converter Ultimate. This software won’t let you down, it’s so magic, you can input any video formats to it, like: MP4, AVI, MOV, WMKB, MKV, etc. You even can load the DVD disc, Blu-ray disc, disc image, folder to it. 250+ output video formats are waiting for you to choose. Best of all, this video converter has the built-in video editor, you can do some basic video editing, like: trim, crop, split, merge, add subtitles and other options. Best of all, If you like to create a DVD disc after the video editing, you can use this software to create the ISO image for DVD.


Part 5: The Video Upload
After the video editing, share the video with friends is a happy thing, you can choose to upload the video to Youtube, Instagram, Facebook, etc. Following will show you simple ways to upload the video to Youtube, Instagram.
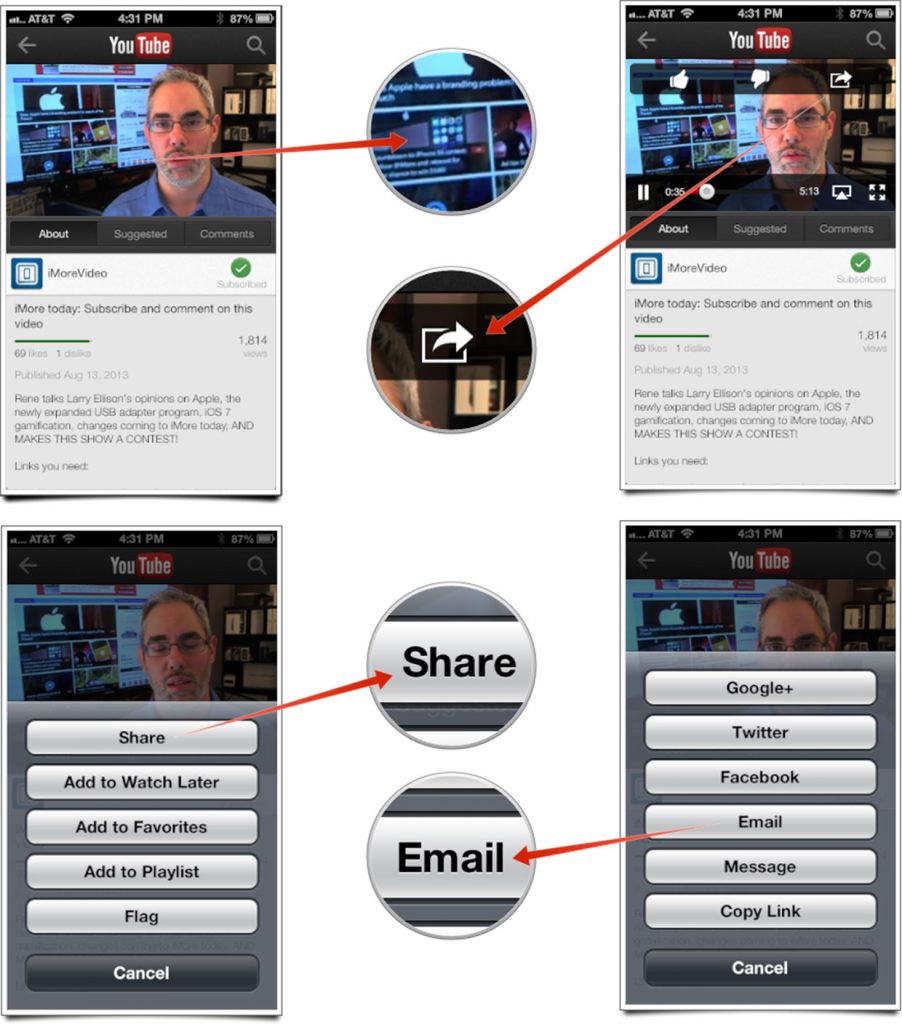
Quick Guide: Upload the Video to Youtube
- Launch the YouTube app from the Home screen of your iPhone or iPad. Find the video that you’d like to share.
- If there aren’t controls already on the screen overlaying the video, tap on the screen inside the video pane in order to bring them up.
- Tap on the Share button in the upper right hand corner.
- Now tap on the Share option. It’s the very first option.
- Choose the way you’d like to share the video from the available options that include Facebook, Twitter, Google+, email, messaging, copying the link, and more.
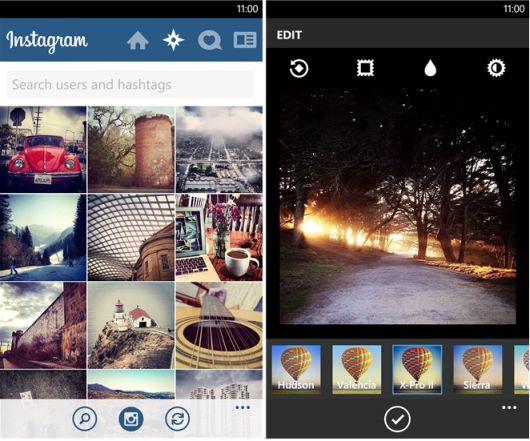
Quick Guide: Upload the Video to Instagram
- Open the Instagram app in your device.
- Tap the camera icon to switch to video.
- A box will appear at the bottom right of your screen. Tap it to access your device’s video album.
- Choose the videos you want to upload to Instagram.
- Since you can only post up to 15 seconds of video on Instagram, use the video strip to select the portion you wish to upload.
- On Apple devices, tap “add” to start the upload. On Android devices, tap the arrow at the screen’s top.