


For Mac users who have exported two or more individually 4K clips from different editing software such as Final Cut Pro or Premiere Pro CC, you may wish to combine the two 4K clips into one single file. Although you can create a new project and put the two videos on the time line and then export but the export process could take hours. Or you may get two 4K files from a continuous shoot today, when you put a two 4K files on the timeline of Mac editing software, you may final get a very brief audio glitch as it moves from the 1st to the 2nd event/clip. Since there are so many drawbacks to directly combine two or more 4K clips into one on the timeline of Mac editing software, therefore, the following article will show you a less time consuming and seamlessly way to merge multiple 4K clips into one with no quality loss with a specific Mac 4K video joiner software.
Best tool to join 4K video clips in less time without quality loss
The top ranked Mac 4K Video merger software we recommended here is call Pavtube iMedia Converter for Mac. The program has full support for 4K clips with various different file formats including 4K H.265, 4K H.264, 4K AVI, 4K WMV, 4K MP4, 4K MOV, 4K MKV, 4K MXF, 4K XAVC/XAVC S, 4K Prores and also 4K raw from RED camera, Blackmagic Uras Mini or Sony NEX-FS700. With the batch converion mode, you can batch import all 4K clips with different formats and compression codec into the program at one time and then rearrange the 4K video order with the “Up” and “Down” arrow to the right order that you plan to. Then just check “Merge into one file” option, you will be able to combine all the 4K clips into one.
As for the output file option, if you don’t want to lose the output file quality, you can just select to output the same file format as the original 4K video and then keep all other video settings unchanged. You can also select to output the 4K video to one of your desired plain digital file formats or hot devices such as iPhone, iPad, Apple TV and editing programs such as FCP, Premiere Pro, Davinci Resolve, Avid Media Composer, etc preset profile formats with the optimal playback or editing settings.
Split/Trim/Crop/Watermark/Flip 4K video
Besides the video merging function, the program also provides other beneficial video editing and customization function to assist you to get the desired video that you want without applying any third-party application. You can split large 4K video into small clips by file size, count or length, trim or cut 4K video to remove unwanted segments, crop 4K video to remove unwanted black bars, change output 4K video aspect ratio, deinterlace interlaced 4K video into progressive form, flip 4K video to change its orientation or display angel, add image/video/transparent text watemark to video or add external SRT/ASS/SSA subtitle to 4K video.
For your convenience, the program is available on both Mac and Windows platform. For Windows users, you can download Pavtube Video Converter Ultimate to merge 4K video on Windows 10, 8.1, 8 and 7. The program is very easy to use, no matter experienced user or fresh could handle it very well. In addition, the results produced by the program are pretty high quality, you can’t tell the difference between the converted video and the original 4K video.


Step by Step to Merge 4K Video in Short Time with No Quality Loss
Step 1: Import multiple 4K Video and adjust the video file order.
Launch and start the program on your computer, click “File” > “Add Video/Audio” or “Add from Folder” to import 4K Video to the program. You can batch load mulitple 4K video at one time. Click the “Move up” or “Move down” arrow under the video file displaying window to adjust your 4K video file order according to your own needs.

Step 2: Choose output file format.
Clicking the Format bar, from its drop-down list, select one of your desired 4K file format according to your own needs. You can also select to output the same format as original 4K file format and then keep all other settings such as including video codec, resolution, bit rate, frame rate, audio codec, bit rate, sample rate, channels, etc unchanged.

Step 3: Merge 4K clips into one.
By checking the “Merge into one file” option beside the “Settings” button, the program will join all the selected video into one single file.

Step 3: Split/Trim/Crop/Flip/Watermark 4K video.
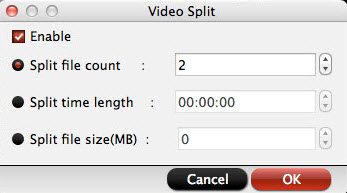
Split 4K video into small clips
Click the split button on the file list to launch the Video Split window. Ticking “Enable” option, you can split the file by file count, time length, or file size.
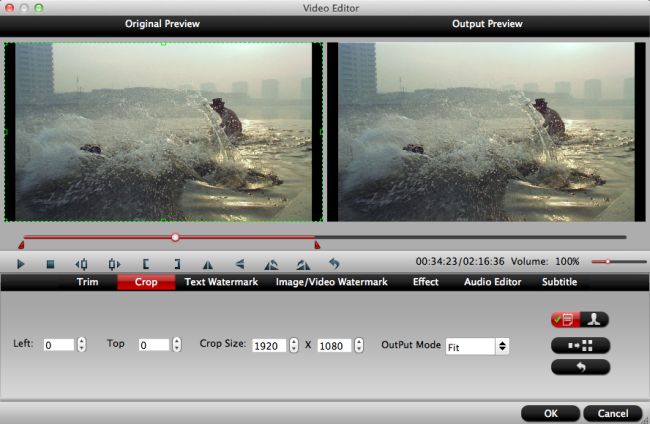
Step 4: Trim/Crop/Flip/Deinterlace/Watermark 4K video
Select an item to activate the “Edit” menu, click the pencil like Edit icon on the left top tool bar to open the video editor window, here, you can play and preview the original video and output effects. Also you can flip or rotate video, trim, crop, add watermark, deterlace video, apply special effect, edit audio or insert external.
Step 5: Begin the conversion process.
After all setting is completed, hit the “Convert” button at the right bottom of the main interface to begin the 4K video merging or joining process.
When the conversion is finished, click “Open Output Folder” icon on the main interface to open the folder with generated VOB files. You will then get a combined 4K video for better playing, editing and sharing.


