Overview
Looking for a hassle-free way to add a subtitle to your AVI video on Windows (Windows 10 included)? It won’t be a big deal if you find the right software. This tutorial will show you how to add subtitles to AVI on Windows 10.

Before start adding subtitles to AVI, make sure the AVI video file can be played on your computer with subtitles. If the downloaded AVI video can’t be played, just install K-Lite Codec Pack, and then take a few seconds on the brief introduction below on how to get subtitles.
a. Get the subtitles from the following popular subtitle provider sites where you can find subtitles for the most popular movies and TV films and the subtitles are available in multiple languages.
http://www.moviesubtitles.org/
(Learn Top 5 Subtitle Download Sites to Download Subtitles)
b. Just google search subtitles and the name of your movie to find your desired subtitles for AVI files.
c. Extract SRT subtitles from Blu-ray/DVD in hand with the step by step guide here.
Note: For a subtitle file to be recognized by most video software etc, it needs to be exactly the same name as the video file apart from the extension. E.g. If your AVI is called videofile123.AVI, the subtitle file should be videofile123.SRT.
How to Add Subtitles to AVI Permanently on Windows (Windows 10 included)
To add subtitles to AVI, you need a subtitle merger tool, which will help you easily embed subtitles in SRT, ASS, SSA, IDX, etc format to AVI on Windows 10.
Method 1: Using Pavtube Video Converter
To load your desired subtitles to AVI movie you have, we highly recommended our Pavtube Video Converter. With it, you can add subtitles to AVI video for saving to a video file to play virtually anywhere. No installation of third-party tools is needed.
Hot Features of This Tool
- Add all kinds of subtitles such as SRT, ASS, SSA to AVI, as well as keep or change AVI to other video formats like MP4, MOV, MKV, etc;
- It also has many other hot edit functions, for example, cut or crop AVI, add effect/watermark to AVI, rotate AVI files, adjust bitrate/sample rate of AVI, compress AVI files, change aspect ratio of AVI file, etc.
- Embed subtitles to almost all kinds of video formats like MP4, AVI, WMV, MOV, FLV, ASF, WebM,, F4V, MXF, MTS and more;
- Better still, this powerful program also enables to convert more than 200 kinds of video files, no matter in SD, HD or 3D, with high quality;
- Works for both Windows (Windows 10 supported) and Mac users. Mac version is here.
Free download it and follow the three steps to easily add subtitles to AVI
1. After installed and runned Pavtube Video Converter, import your AVI video by dragging video to the primary windows, or by clicking “File > Add Video/Audio” button to locate AVI video on your computer.

Step 2: Add subtitle to AVI video
Click “Edit” button to launch the video editing window. Go to “Subtitle” tab and check the “Enable” box to allow you to add SRT/ASS/SSA subtitles to AVI videos. Then Click “Browse” to find and import the downloaded subtitles.
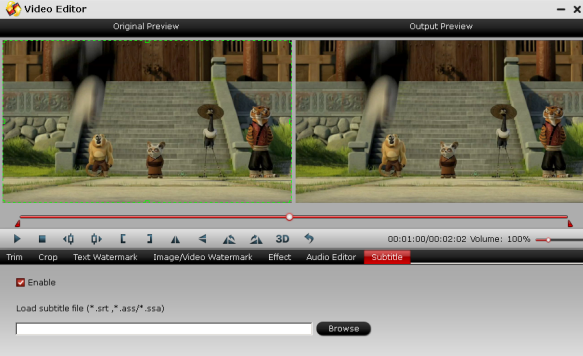
Note: You can also stick a text watermark or image watermark to your AVI video in the above video editing window.
Step 3: Export AVI video with subtitle in desired format
Now it’s time to save subtitle to AVI video permanently. Firstly, choose a desired output format by clicking the “Format” bar. Then, choose a video format or preset formats for iPhone, iPhone, iPod, iPad.
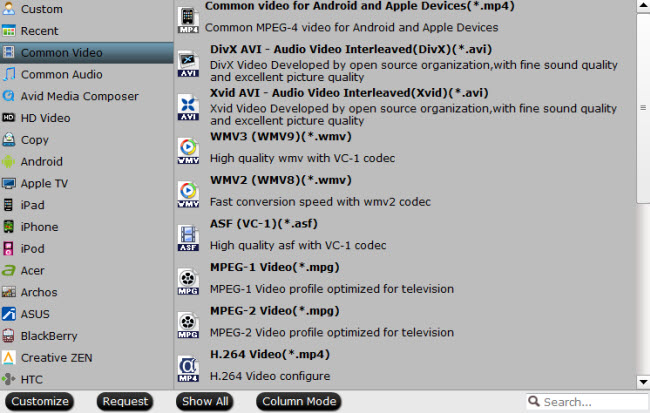
Finally, click “Convert” button to start conversion. The subtitle will be written permanently on the output video after conversion.
Method 2: Using Pavtube Video Converter Ultimate
Pavtube Video Converter Ultimate is another choice to help you add subtitles in .srt, .ass and .ssa to AVI videos with just a few clicks. It can not only attach subtitles to AVI, but also supports many other video formats, like MP4, MKV, MOV, WMV, etc. What’s more, it also helps to set the subtitle size, subtitle style, etc according to your preference. Besides adding subtitle files to your video, it is an all-in-one program with many other functions, which enables you to edit videos, convert video, rip Blu-ray/DVD easily and quickly, etc. If you are running on Mac OS X, turn to iMedia Converter for Mac.
Download Subtitle to AVI Converter:
How to Add subtitles to AVI on Windows 10 easily and fast
1. Import the AVI video
After you install and open Video Converter Ultimate (Windows 10 supported), you can directly drag the target videos to the program or click “Add Video” to add the AVI videos.
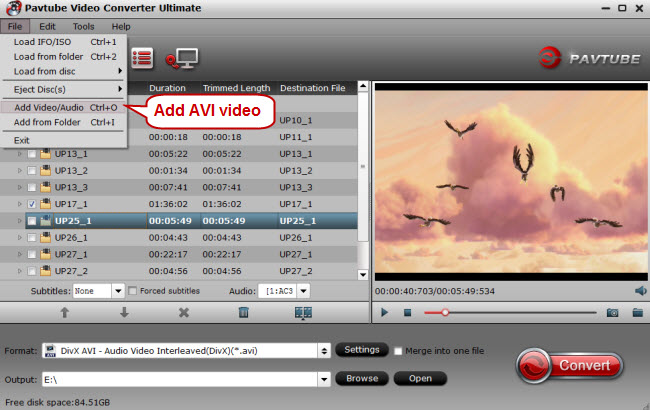
2. Add subtitle to AVI video
Click the Edit button to open the subtitle loading and editing window. Tap “Subtitle” option and check the “Enable” icon. Then, by clicking on “Browse” to import your *.srt, *.ass, *.ssa subtitle file you’ve downloaded. After the subtitle is loaded, you can preview it.
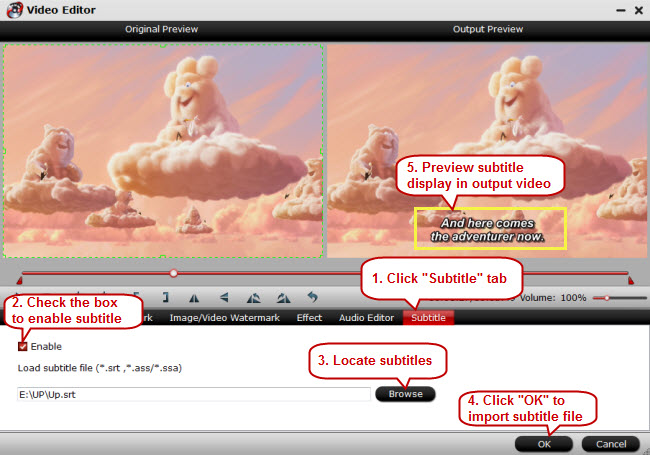
Tip: You can change the subtitle size, style, font if necessary. When everything is done, simply click “OK” button. Plus, you can also add watermark, apply effects, and crop, trim your AVI files in the above video editing window.
3. Set output video format
To add subs to AVI (to keep the output video as AVI with subtitle), click the “Format” drop-down button to select AVI format from the Common Video profile. If you want to convert the AVI video files to other formats, you can select another format from the Format list.
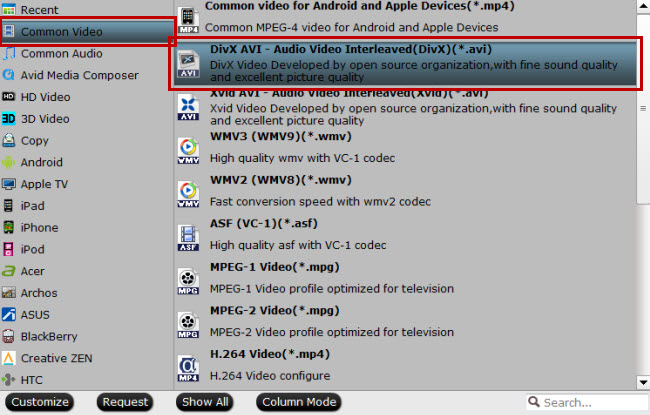
4. Finish AVI subtitles merging
Click the “Convert” button to start adding SRT or ASS, SSA to AVI video. When the conversion is completed, the subtitles file will be embedded into the output AVI video. Now you can play your AVI movies with subtitles anywhere you want.
Method 3: Using Freemake Video Converter
This way of getting the subtitles into AVI only requires the installation of the Freemake program. The slight downside is you don’t get any control over the subtitle such as placement, font or colors etc.
1. Download Freemake Video Converter and install it. Take care during the install process as the installer contains adware options. Run the program when ready.
2. Click on the Add Video button and load your AVI video file. At this point you can actually load many other different types of video file not just AVI, including MP4, MKV, Youtube clips etc.

3. Click on where it says “Subtitles off” on your video file and select the subtitle file. If it’s differently named to the video file, you can locate it by clicking on “Add subtitles…”.

4. You have a choice next of whether just to embed the subtitles and re-encode the AVI or another different video format, or you can burn it straight out to DVD.

Tip: To convert the video file back to AVI, click the “to AVI” button across the bottom.
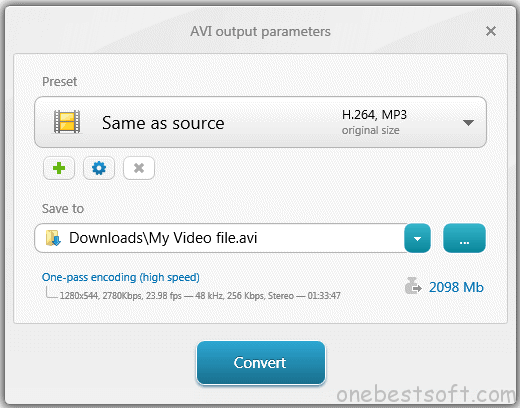
You barely have to do anything in this window. Choosing the “Same as source” preset will output the video with the same settings as the input file, and “One-pass encoding speed” and the output size will increase or decrease the quality of the output. Simply hit Convert and wait for the process to complete.
- For mac users, get Freemake Video Converter Alternatives for Mac OS X.
Method 4: Using Format Factory
Format Factory is another very easy program to embed subtitles into AVI and other format video files, but has a few more options than Freemake such as support for 4 subtitle formats SRT/SSA/ASS/IDX, color, size and font editing.
1. Download Format Factory, extract the zip file, then install and launch it.
2. Click on All to AVI in the Video tab on the left of the window. In the next window, click Add File and locate the video file.
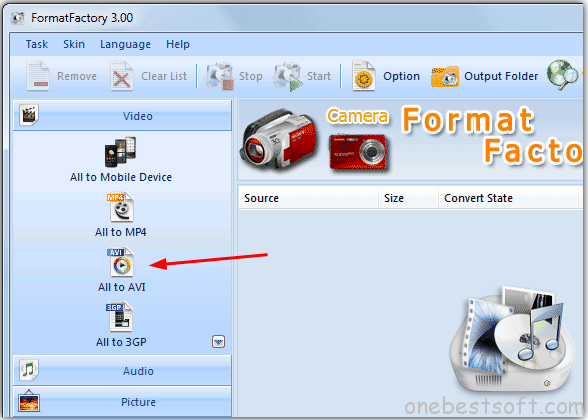
3. Still in the All to AVI window, click Output Setting. From here you can select the output quality from the drop down menu, obviously Medium or High are preferable. The green icons are for XVID and the blue are for DIVX which is down to your personal preference. Or if you prefer, you can also use AVC.
4. To add the subtitle file, double click on Additional Subtitle in the settings list, then click on the line “Additional Subtitle (srt;ass;ssa;idx)” and a small icon will appear which you can press to locate the subtitle file. The size of the subtitle can be altered from 2 – 6 (default is 4), the other settings shouldn’t need touching. Click OK -> OK.
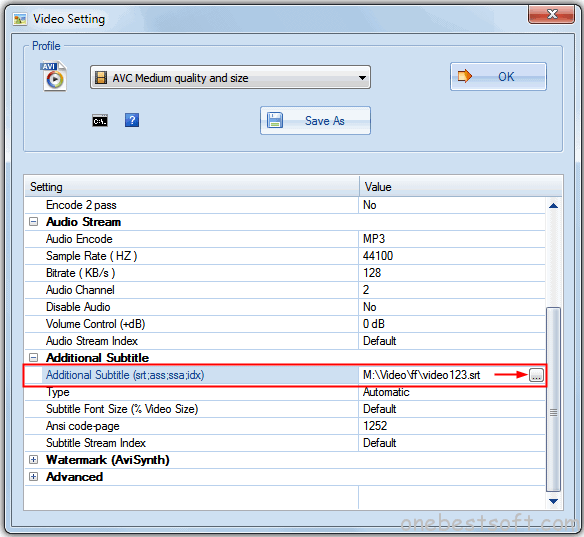
5. Then simply click on the Start button to encode the subtitles into the video. If you go into the program’s Options there is the ability to change the subtitle font and also the font color and its outline color.
Method 5: Using VirtualDub And VobSub
This method is a little more manual than the above one, but users who have played around with video editing before will likely know VirtualDub and VobSub quite well.
1. Download VirtualDub and VobSub.
2. Extract the VirtualDub zip to C:\VirtualDub.
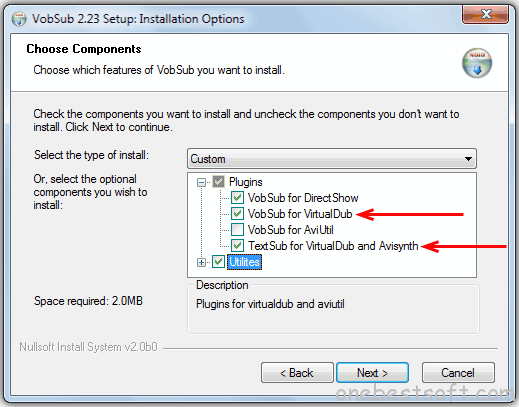
3. During the install of VobSub, expand Plugins and select “VobSub for VirtualDub” and “TextSub for VirtualDub and Avisynth”.
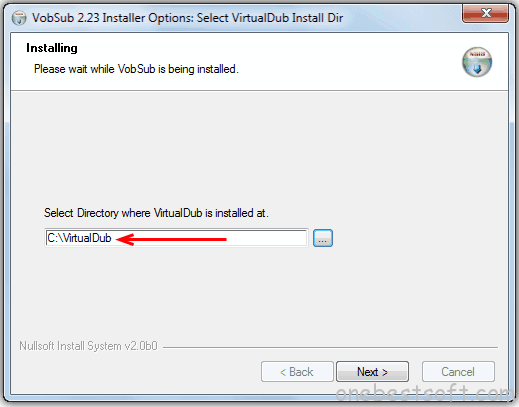
4. When asked to select the directory where VirtualDub is installed at, browse to C:\VirtualDub.
5. After you finish installing VobSub, run VirtualDub.exe from C:\VirtualDub
6. Go to File -> Open Video File and select the AVI.
7. Go to Video on menu bar, select Filters (or press Control+F)
8. Click the Add button, select TextSub 2.23 and click OK.

9. In TextSub settings, click the Open button and look for the SRT or SUB subtitle file. In the file dialog there are two options that need setting; Character set can be used if you are trying to embed non English characters such as Chinese or Russian etc. Set the FPS to match that of your video file. Click OK and OK.

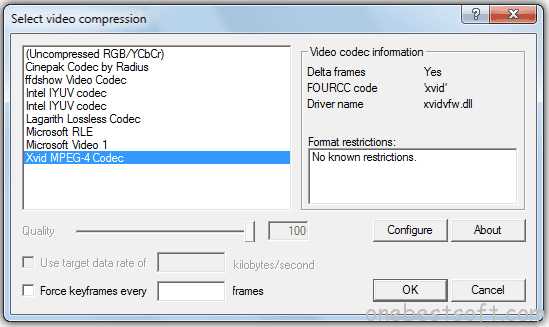
10. Go to Video on the menu bar and make sure that Full processing mode is selected. In the same menu select Compression (or press Control+P) and choose the video compression that you’d like to use, use DivX or xVid.
12. Finally, click File and select Save as AVI (or press F7), and wait for it to compress.
You will then have a new AVI file with subtitles embedded into it.
It looks like a lot of steps but it’s actually quite easy when you’ve got used to it. Do be aware that because the AVI format is lossy meaning the quality of the video degrades through compression, a re-encoded video’s quality might be slightly less than the original. You can counteract this somewhat and make sure the difference is as small as possible by selecting a high quality preset of the output file, or a target size of around the same or slightly larger than the original.
Conclusion
After testing, I found the first three method are easy, works well and the results are very good, however Freemake Video Converter has less output formats than other ones. And if you want some more control over the subtitles, try method 4 and method 5.


