With substantially increased resolution, high dynamic range support, much more data storage and advanced surround sound effects, 4K Blu-ray disc kill both 4K streaming and also common Blu-ray disc in all those great aspects. To play Ultra HD Blu-ray disc on your 4K TV, you will need to buy an Ultra HD Blu-ray player. Or a more convenient and economical way is to remux and backup 4K Blu-ray to external hard drive on your local computer for viewing on TV via USB drive or media server.
Bypass copy protection from 4K Blu-ray
To remux or backup 4K Blu-ray to external hard drive, you will first need to break the Blu-ray encryption equipped on the 4K Blu-ray disc. Here, you can easily get the job done with our powerful 4K Blu-ray Ripper – Pavtube BDMagic, which has built-in decryption tools to assist you to powerfully and automatically remove all Blu-ray copy protection and region code in the background.
Remux and backup 4K Blu-ray to external hard drive
Difference between remuxing and transcoding
Before showing you how to remux or backup 4K Ultra Blu-ray to external hard drive, first let’s distinguish remuxing from trancoding. Remuxing refers to the process of changing the “container” format used for a given file. For example from MP4 to MKV or from AVI to MKV. It also allows adding or removing of content streams as needed. Remuxing differs from Transcoding in that remuxing a file simply repackages the existing streams while transcoding actually creates new ones from a source.
4K Blu-ray to external hard drive remuxing and backup
It is well known that Blu-ray Ripper process can be very time consuming especially for 4K Blu-ray disc, therefore, if you don’t have enough time and also wish to get a high quality files with less quality loss, remuxing them to a digital file format or making a 1:1 full disc copy or main movie copy (time-saving and space -conserving than full disc copy). The following part will show you how to remux 4K Blu-ray or full disc copy and main movie copy with our best 4K Blu-ray Ripper program listed below.
Hot Search: Blu-ray to External Hard Drive Mac | Blu-ray to Hard Drive on Mac
Here, we still recommend you to complete the job with our best Ultra HD Blu-ray Ripper – Pavtube BDMagic. The program can do you a great favor to remux 4K Blu-ray disc/BDMV folder/ISO image file to external hard drive in various different video and audio file formats including Remux AVI/MP4/MOV/MPEG-PS/MPEG-TS/DTS/FLV/WMV/3GP/MP3/AAC/AC3. As for the lossless backup function, you can make a 1:1 full disc copy of 4K Blu-ray of original Blu-ray structure with all the subtitle languages, audio tracks and chapter information well preserved and also a fast main movie copy without unwanted ads, trailers, features, comments, etc. The full disc copy of 4K Blu-ray will produce a 4K BDMV folder, while the main movie copy of 4K Blu-ray will generate a 4K M2TS files.
If you don’t care much about the long conversion time and the output quality, you can also use our program to backup 4K Blu-ray to plain digital file formats with the resolution of 4K/2K/HD/SD or directly output preset profile formats that’s tailored for specific devices or programs with the optimal profile settings.
For your convenience, Pavtube BDMagic is available on both Windows and Mac platform (get Mac version). In addition, it also keeps constant update with perfect support for the new operation system (like Windows 10 and macOS Sierra). The program itself is quite simple to use, anyone can learn to use it in minutes. The remuxed and backup files with the program are high quality, you can’t tell the difference between the output video and the original 4K Blu-ray disc.
Step by Step to Remux and Backup 4K Blu-ray to External Hard Drive with Less Quality Loss
Step 1: Load 4K Blu-ray disc.
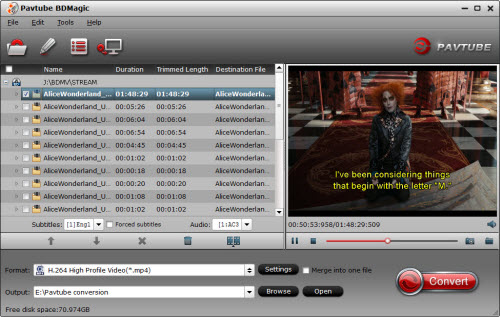
Insert the 4K Blu-ray disc into your computer’s Blu-ray drive. If your computer doesn’t ship with a drive, you will need to purchase an external USB Blu-ray drive to read on the data on Blu-ray disc. Then press “File” > “Load from disc” option on the main interface, alternatively, you can also import 4K Blu-rayBlu-ray folder or 4K Blu-ray ISO files with the program.

Step 2: Remux 4K Blu-ray to digital format.
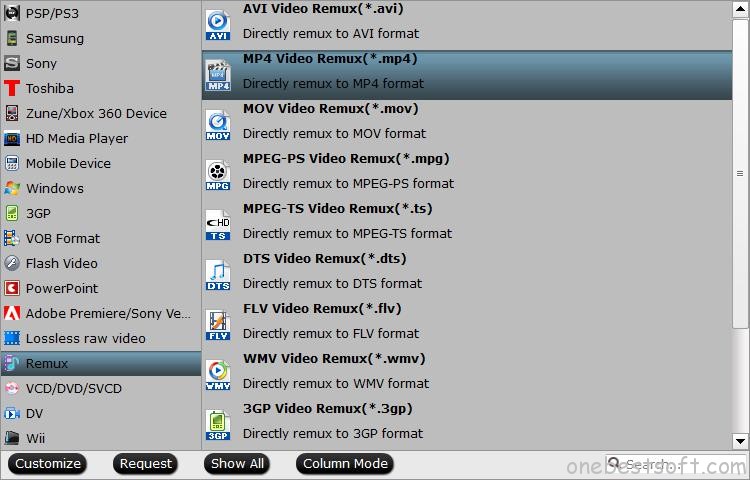
Scroll down the “Format” drop-down options, under “Remux” main category, choose one of your desired remuxed video or audio format such as “MP4 Remux Video(*.mp4)”, you can also choose to remux 4K Blu-ray to other format according to your own needs.

Tips: To remux video, make sure to all the profile parameters including video codec, resolution, bit rate, frame rate, audio codec, bit rate, sample rate, channels, etc in the “Profile Settings” window are not changed.
Step 3: Full disc copy or main movie copy of 4K Blu-ray.
Full disc copy
Make a full disc copy by hitting the  icon on the top tool bar of the main interface.
Main movie copy
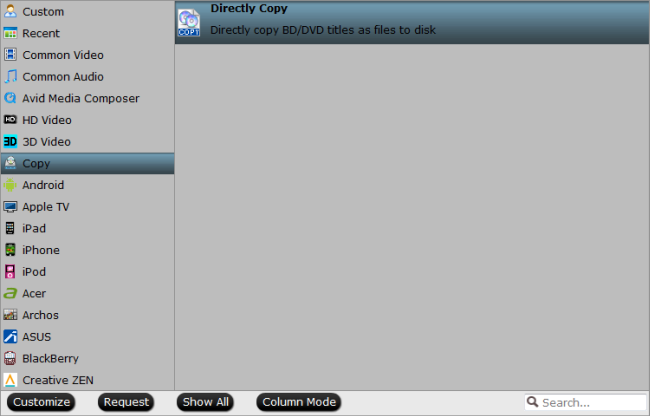
From “Format” bar, select “Copy” > “Direct Copy” to copy the main movie of the DVD disc.

Step 4: Start 4K Blu-ray remuxing or backup process.
After you have finished all the settings, go back to the main interface, press the right-bottom “Convert” button to start to remux 4K Blu-ray to your desired remuxed format or a full disc copy or main movie copy of 4K Blu-ray.
When the conversion is completed, click “Open output folder”, a window will pop out with all your converted files. Copy the converted 4K movies to external hard drive for streaming to your 4K TV via USB or media server to view with perfect picture quality and sound effect.


