


The Google Nexus 9 is said to be an 8.9-inch Android tablet made in collaboration with none other than HTC – a company widely known for its quality smartphone designs. The Nexus 9’s 8.9-inch display could get the Nexus 10’s sharp QHD resolution (2560×1600) display and it is expected to enter the market around October, 2014 with a new OS.
If you have got one, you may cannot wait to enjoy digital life on it. While, for some newbies especially those new to Android (especially Android L for Nexus 9), they would have some issues like media file transferring from PC/Mac to Nexus 9. Here we’d like to share the solution with all the Nexus 9 users.
Follow these steps to copy a file or two from your computer to the Nexus 9:
Windows Tranfer
1. Connect the Nexus 9 to the computer by using the USB cable.
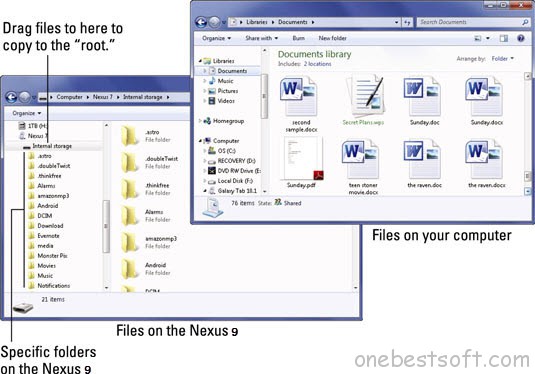
2. On a Windows computer, if the AutoPlay dialog box appears, choose the option Open Device to View Files. Otherwise, open the Computer window, and then open the Nexus 9’s icon. To access the tablet’s files, open the Internal Storage icon.
There’s no need to mess with anything on a Macintosh — the Nexus 9’s folder window opens up, all bright and sunshiny, on the screen.
The folder window you see looks like any other folder window. The difference is that the files and folders in this window are stored on the Nexus 9, not on your computer.
3. Locate the files you want to copy to the Nexus 9.
Open the folder that contains the files, or somehow have the file icons visible on the screen.
4. Drag the file icon from its folder on your computer to the Nexus 9 folder window.
If you want to be specific, drag the file to the download folder; otherwise, you can place the file in the Nexus 9’s root folder. Avoid dragging the file into other, specific folders, which would make the file more difficult to locate later.
5. Close the folder windows, and disconnect the USB cable when you’re done.
Mac OS transfer
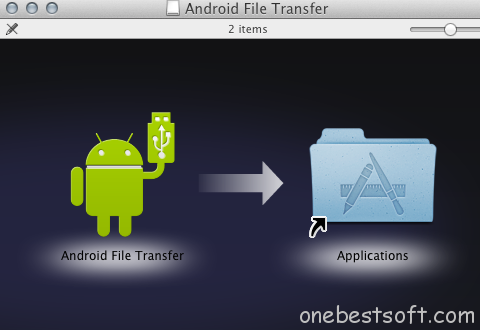
1. Download and Install the Android File Transfer for Mac. Once downloaded, drag the .dmg file into your applications folder.
2. Launch the Android File Transfer application and connect your Nexus 9. You should see a finder window pop up and your files will be displayed on your display.
3. From here onwards, just drag and drop files until you’ve reached your desired result.
4. Disconnect the USB cable when you finish.
Tip 1: If you are experiencing difficulties and your device is not being recognised by your Computer, you can try:
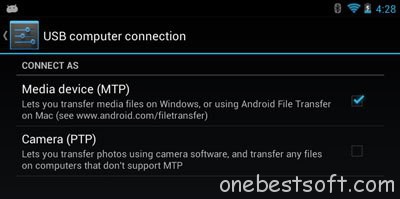
1. Ensure the device is set to USB Computer Connection > MTP (Media Device mode) – To do this:
- Tap “All apps” and go to “Settings”
- Under ‘Device’, tap “Storage” and press the “Menu icon”
- Select “USB computer connection” and make sure the “Media device (MTP)” option is checked.
2. Ensure you are using the correct data transfer cable. The official, originally supplied data cable is the only guaranteed to connect your device successfully.
3. Try another USB port on the computer – when your device first connects you should be asked if you want to ‘open folder to view files’.
Tip 2: Any files you’ve copied are now stored on the Nexus 9. What you do with them next depends on the reasons you copied the files: to view pictures, use the Gallery, import vCards, use the Contacts app, listen to music, or use the Music app, for example.
- Copying music to the Nexus 9 is tricky. The tablet doesn’t recognize every music file format, such as the WMA format, which is popular in Windows. Copy MP3 audio files only if you want to listen to them on the Nexus 9.
- The best way to synchronize music is by using a music jukebox program on your computer. Lamentably, neither Windows Media Player nor iTunes behaves well with the Nexus 9. That situation may change in the future.
- My advice is to drag the files you want to copy to the Nexus 9 to your computer’s desktop. Make a little pile of them there. Then you can drag over the lot to “lasso” them as a batch and drag them over to the tablet’s folder.
Tip 3: Get frustrated that the movies or music transferred from PC/Mac cannot be recognized by Nexus 9 tablet? You should note to copy files to Nexus 9 Tablet successfully, you’d make sure the file formats are in friendly format for Nexus 9.
First, we list the Nexus 9 file formats below for you as reference
- Video format: MP4/H.264/DivX/WMV
- Audio format: MP3/WAV/eAAC+/WMA/Flac player
If your moved files are not in the formats as we show you above such as movies in WMV, AVI, FLV, MTS, M2TS, MOD, MOV, TiVo, etc, you need to change the format first. And a fast and easy conversion, an easy-to-use and professional video converter for Nexus 9 is the key. We’re glad to recommend you the best Pavtube Nexus 9 Movie Converter, which enables you to reformat any movie file(including Blu-ray and DVD video) in different formats to Nexus 9 compatible format MP4 at super fast speed and with excellent video quality.


my nexus 9 with 6.0.1 does not have a usb computer connect setting and I can not get a recognition by my Mac. What should I try?