


Sony has finally released a media player for the PlayStation 4, only a year and a half after the console launched. The media player, if you’re not aware, should show up on your main PS4 screen, but you will need to first download it in order to use it. Sony has given users the opportunity this time round to play a lot of file formats, including the increasingly popular MKV container. However, despite allowing you to play these formats, the PS4 media player doesn’t at the moment allow you to play the embedded subtitles in the files. You have to have external subtitle files named the same as the media file, in the same director. 
Hot Search: ISO to PS4 | WMV on PS4 | 4K Movie and Videos to PS4 | Improve TV Picture Quality with PS4 | Region Locked Blu-ray/DVD to PS4
Part One: Professional Way of Add Subtitles to Videos on PS4 Media Player
Pavtube Video Converter Ultimate is the best choice to help you add subtitles in .srt, .ass and .ssa to MKV/AVI/MP4 videos for PS4 Media Player with just a few clicks. It can not only attach subtitles to MKV/AVI/MP4, but also supports many other video formats, like MP4, MKV, MOV, WMV, etc. What’s more, it also helps to set the subtitle size, subtitle style, etc according to your preference. Besides adding subtitle files to your video, it is an all-in-one program with many other functions, which enables you to edit videos, convert video, rip Blu-ray/DVD easily and quickly, etc. If you are running on Mac OS X, turn to iMedia Converter for Mac.
Learn>>Top 5 Subtitle Download Sites to Download Subtitles you need
Here, we can take the “Add Subtitles to MKV for PS4” as example
Free download and install Subtitle to PS4 Converter 

Other Download:
– Pavtube old official address: http://www.pavtube.cn/blu-ray-video-converter-ultimate/
– Cnet Download: http://download.cnet.com/Pavtube-Video-Converter-Ultimate/3000-2194_4-75938564.html
Step 1: Run the right version app on your computer and import your MKV videos to it by clicking the “Add video” icon to import MKV video. (Snapshots are based on Windows version) 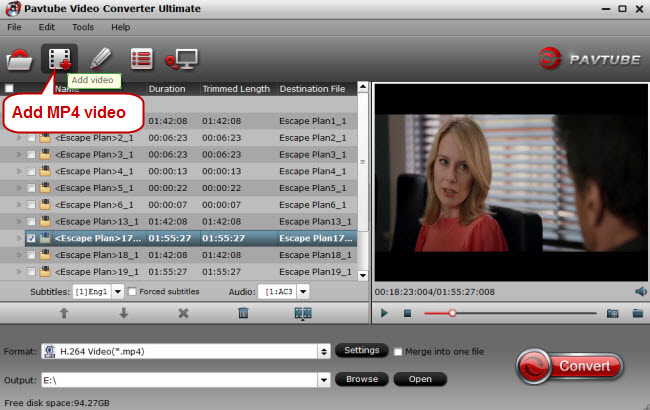
Step 2: Click “Edit” or the pencil icon  to switch to the editing interface, where you can find multiple editing functions and “Subtitle” is just one of them. Click the “Subtitle” tab and check the “Enable” box to allow you to add SRT/ASS/SSA subtitles to MKV videos. Then Click “Browse” to find and import the downloaded SRT/ASS/SSA subtitles.
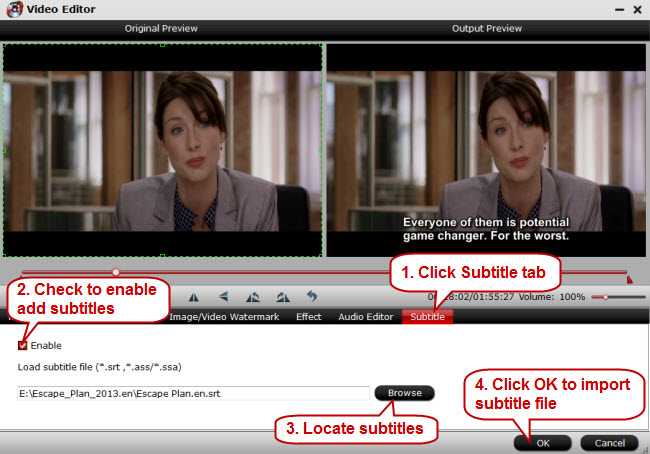
Note: Pavtube Video Converter Ultimate only supports SRT/ASS/SSA subtitles, and make sure that the subtitle file and your MKV video files are kept in the same folder sharing the same name.
Tip: You can change the subtitle size, style, font if necessary. When everything is done, simply click “OK” button. Plus, you can also add watermark, apply effects, and crop, trim your MKV files in the above video editing window.
Step 3: Go back to the main UI and click “Convert” to start inserting SRT subtitles to your MKV videos. If you don’t want to keep the original MKV format, just click the format bar to choose the output video format you want before conversion.
Now, test the MKV video on PS4. It should has subtitle displayed on the screen.
Also learn >>5 Methods to Attach subtitles to AVI in Windows 10.
Part Two: How to Play Subtitles on PS4 Media Player from www.playstationing.com
At the moment only external SRT files work, SUB/ASS/SSA/MKS files do not work.
So how do you do this with MKV files that you might already have? Here’s a quick guide to get you on your way.
- Download and install mkvtoolnix.
- Download MKVExtractGUI-2, extract into the directory where you installed mkvtoolnix.
- Download and install Aegisub.
- Run MKVExtractGUI-2, set the input file to your MKV file.
- Select the subtitle file, and click extract. If this file extracts as SRT, skip to step 8. If the file is not an SRT file, continue to step 6.
- Run Aegisub and open up your subtitle file.
- Go to File menu -> Export -> and export the subtitle file as an SRT to convert it.
- Place this file, named the same as your video file, on to your USB stick. You will have to place any video files in a folder on the USB stick in order for the PS4 to recognise them.
- On your PlayStation 4 go to Settings -> Accessibility -> Closed Captions -> Check “Display Closed Captions“
- Load the Media Player and play a video, press the Options button on the controller, select CC, and turn on. This option will not show up if you skip step 9.
- Congratulations! Your subtitles should now display.
There are also some advanced options for the subtitles in the Closed Captions settings, so you can change how they look. I am hoping that Sony will update the media player soon to support embedded subtitles, and more fonts and options for the subtitles as they look a bit garish as the moment. Source:here.


