


Copying the multiple DVD discs collection to your iMac is a great way to protect your precious DVD disc, for example: You can protect the DVD discs from scratch, water ot high light exposure.Thankfully, iMac is equipped with the software and power to copy DVD disc to the hard drive, and then you can burn that image to a blank DVD disc. Even so, you only can copy the unprotected DVD discs on iMac.
We know that DVD makers taks some technology to protect the DVD content which makes it difficult to copy a DVD. Is it impossible to copy DVD on iMac? No, you just need a third need to a additional tools to remove the DVD copy protection, then copy a DVD on iMac again. This post will show you the complete way to copy DVD discs on iMac smoothly.
Part 1. Make a Copy of Your Unprotected DVD With iMac
1. Insert the DVD disc you want to copy into your DVD drive.
NOTE 1: You need to buy a new external DVD drive, at the same time, when the iMac start to play the DVD disc, please stop it.
NOTE 2: When you choose to copy the DVD to the hard drive, you need to check the hard drive space is enough for your DVD: Select the DVD in the finder and then press Command+I to get info about the disc.
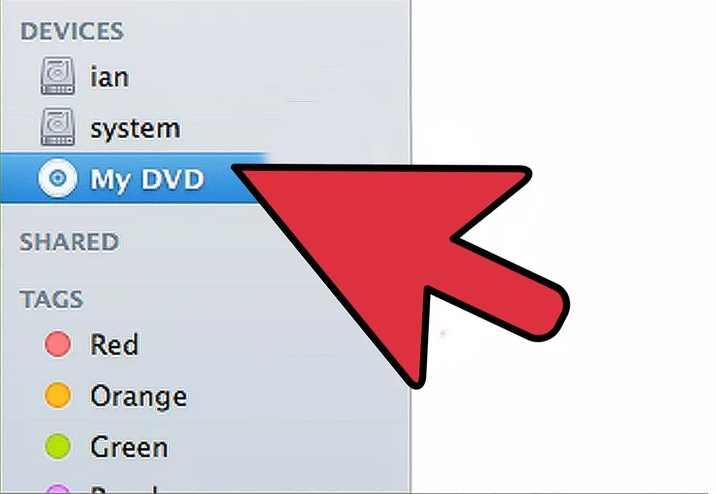
2. You can find it in the Applications folder, located in the Utilities section. Open Disk Utility.
3. Click on the name of your DVD which should be in the white pane on the left-hand side.
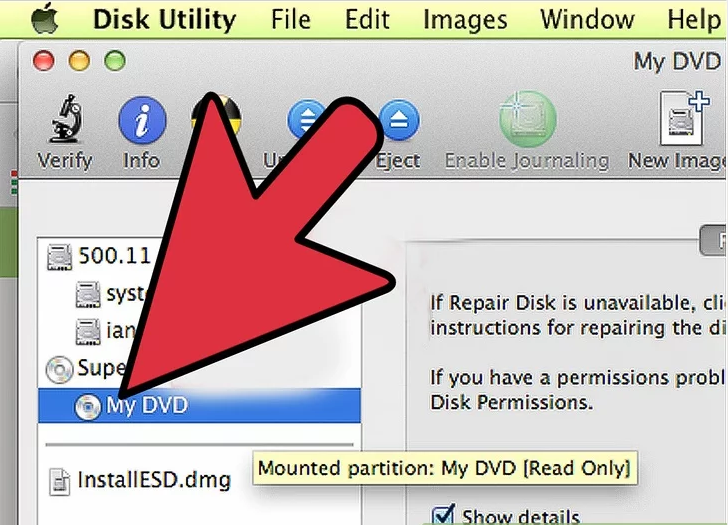
4. Choose New Image in the disk utility toolbar. A "Save As" dialog box will appear. Then Choose a destination where you want to save to the DVD.
Tip: You also can set the image format (at the bottom; not format) to DVD/CD Master, set the encryption to None.

5. You can watch the movie straight from your hard drive if desired, or convert it and burn a new disc. After that, eject the DVD disc.
Part 2. Make a Copy of Your Protected DVD With iMac
From above, we know that some companies have included methods to thwart DVD copying, such as digital rights management (DRM), CSS, DVD region code, UOPs and so on. So you cannot use Disk Utility to make a copy of it. You will need a third-party program that is made to remove the copy protection, the best and popular tool is Bytecopy for Mac which is a professional DVD ripper, removes most DVD protection, also can convert DVD to multiple video formats effortlessly. Best of all, you can copy the full DVD disc, copy the DVD main content with 0 quality loss, of course, you can enjoy the fast speed too. More information, you can refer to this DVD Ripper Guide.
Basic Work Flow: Insert DVD and Open Software —-> Choose DVD Copy Mode —–> Start DVD Copy Process
Download: 

First, the innterface is user-friendly, you can insert your DVD disc to iMac by a DVD drive, run this software, and click File and choose Load files button to import DVD videos directly from your disc. You can also load ISO/IFO image to it. This software will detect the DVD main titles automatically. You also can select the chapters you want to copy.

Then, you need to make the important decision, which modes do you want to copy the DVD, this software provides 3 modes for you, you can copy the full DVD disc which can keep all the original DVD content, you also can reduce the video files by copying the DVD main title, best of all, if you want to keep the DVD videos forever, you can choose to get the digital DVD movies, 250+ video formats are ready for you: H.264, H.265, MOV, AVI, MKV, WMV, MPEG-2, etc.
Option A: Just click ![]() on the top of this software, this button will help you to copy the whole DVD without any missing, like: containing video, audio, subtitle, menu and navigation contents and so on. Then click “Browse” to choose the output file save location.
on the top of this software, this button will help you to copy the whole DVD without any missing, like: containing video, audio, subtitle, menu and navigation contents and so on. Then click “Browse” to choose the output file save location.
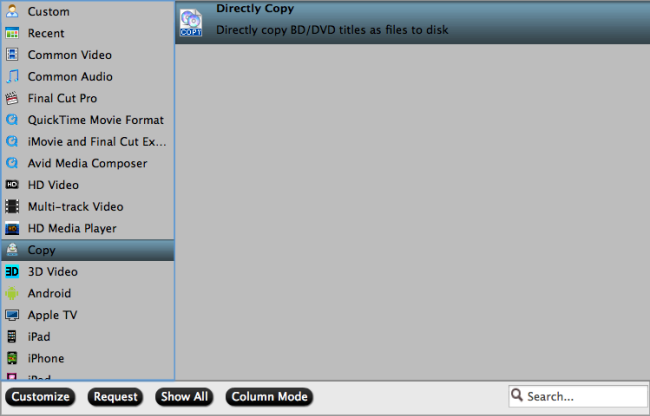
Option B: When you want to copy the DVD e main title which can save many space on your hard drive. Navigate to “Format” > “Copy” > “Directly Copy”
Option C: Click Format button and open the output video list, you can find 200+ video formats at here, like: MP4, MKV, AVI, etc. You can choose any video formats you need, friendly suggestion: You can choose multi-track MKV video format which can keep the video subtitles, chapters, multi-tracks, you can choose to keep or remove them by your own need. Getting digital videos, you can maintain your DVD library better.
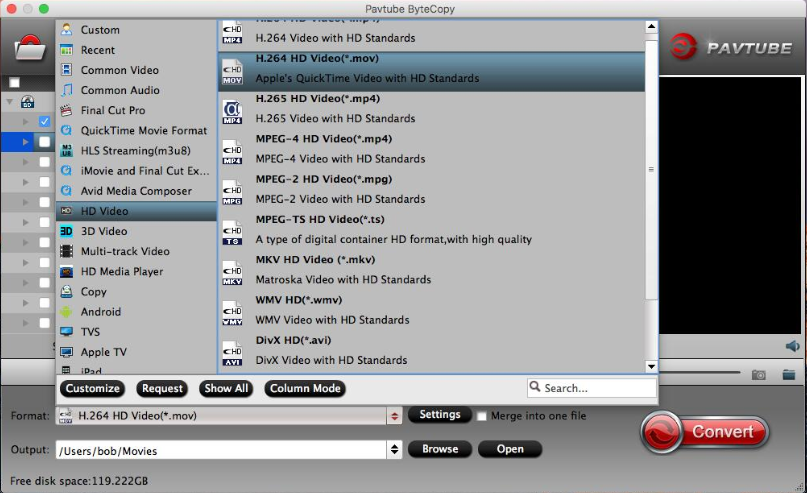
After choosing the DVD copy mode, if you want to know the output video files better, you can click Setting button and know the video codec, audio codec, vidoe resolution, video frame, video bitrate, etc well, you can adjust them too if you are not satisfied with them, you can full control of the video.
Finally, go back to the main interface, you can choose the output video save location, you also can click Convert button directly, the output files will be saved on your iMac hard drive automatically. After the video conversion is done, you can click Open output folder and find the files quickly.
Tips: When you copy the DVD on iMac, you need to know these:
- The video on DVDs is in a special format called mpeg2, which is similar to mp3 for audio files. Mpeg2 makes video files small enough to fit on DVDs. They are actually even bigger than these very large DVD files.
- DVDs have a number of copy prevention mechanisms. When you rip the DVD, you strip off those mechanisms but copy the rest of the video unadulterated. This means that the ripped DVD will take up as much space as the files on the DVD itself.
- Understand the copyright law in your current location. Don’t break the law now just because it has become easy.
- You can remove most DVD copy protection, but you can’t use other DVD disc for some private usage or make money.


