


Subtitles not showing in Windows 10 H.265 MKV
“Hi, I have a H.265 MKV file with embedded subtitles (English) that are not showing in WMP on Windows 10. I did a clean (remove the old version using the UNINSTALL button, removed the folders C:\Program Files (x86)\Shark007 and C:\ProgramData\Advanced) install of the latest (7.2.2) advanced coded pack, selected shark007 recommended settings on the 32bit config application, but no subtitles. With H.264, subtitles are Ok! If I use the Movies & TV application, subtitles are displayed as expected. Is there any special settings that need to be done to show subtitles on H.265 MKV files? Thanks.”

Fix Windows Media Player not showing H.265 MKV subtitles
Solutions 1: Specific settings for H.265 video in MKV with subtitles
When playing media with subtitles on Windows Media Player, first make sure that the previous settings have turned subtitles options on, it not, here is the solution:
Step 1: Click the “Play” menu, point to “Lyrics, Captions, and Subtitles”, and then click “On if Available”;
Step 2: If the Play menu isn’t visible, click “Organize”, point to “Layout”, and then select Show menu bar;
But for H.265 MKV files, you have to do the following specific settings to let Subtitles showing when playing in Windows Media Player.
[Reset All]
[x] SUGGESTED settings
[x] on the MKV TAB, choose to [x] disable Media Foundation for MKV
The above setting would also break the Movies and TV app from playing any MKV
Solution 2: Transcode H.265 MKV to H.264 for subtitles showing
If above listed solution still doesn’t work or if you wish to find a simple way to play H.265 MKV files with subtitles in Windows Media Player. One of the effective solution is transcoding H.265 MKV to H.264, which will ensure subtitles showing in Windows Media Player. Here, you can complete the job with a powerful H.265 to H.264 Converter program – Pavtube Video Converter Ultimate, which helps to efficiently transcode H.265 MKV to H.264 MKV with subtitles well preserved. If the subtitles in your original H.265 MKV files is damaged, you can also add external SRT/ASS/SSA subtitles to the video with its built-in subtitle function in the “Video Editing” window.
Hot Search: Add Subtitles to Videos for PS4|DVD ripped with subtitles | Add Subtitles to Blu-ray
The program supports batch conversion load, so that you can batch import multiple H.265 MKV files, H.265 MP4 files or other digital files formats with different file formats and codec into the program to save your precious time. The program supports Nvidia CUDA and AMD APP technology, so that you can accelerate H.264 encoding speed with up to 6x.


Step by Step to Transcode H.265 MKV to H.264 with Subtitles Well Preserved
Step 1: Load H.265 MKV files into the program.
Run the program on your computer and click “File” > “Add Video/Audio” or “Add from folder” to add unsupported MP4 files into the program. Click “File” > “Load from folder” or press the “Folder” icon on the main interface, you can batch load multiple files into the program.

Step 2: Output H.265 MKV to H.264 with subtitles.
After loading H.265 MKV files, the program can automatically detect subtitles from source H.265 MKV files and list them in each video title for you to choose from. Check the files that you want to keep subtitles, on the file displaying list, click “Subtitles” drop-down list and select one of your favorite subtitles to output.

Step 3: Output H.264 MKV format.
From the drop-down list options of “Format”, select to output “MKV(Mastroska) Video(*.mkv)” from “Common Video” main category.
Output MKV format
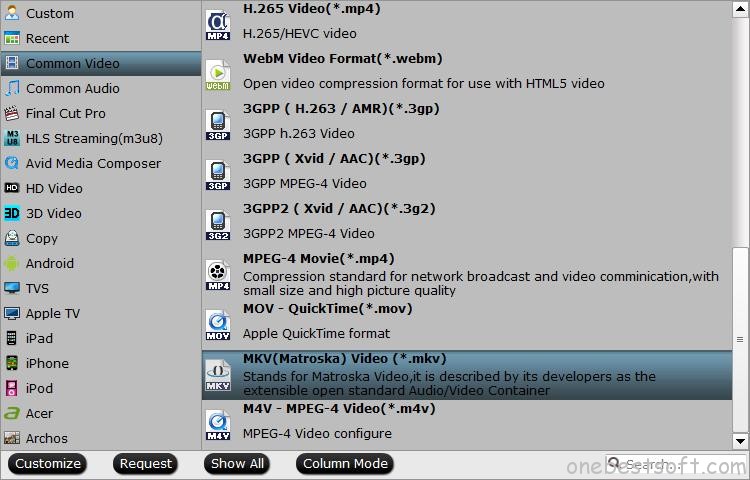
Output H.264 MKV format
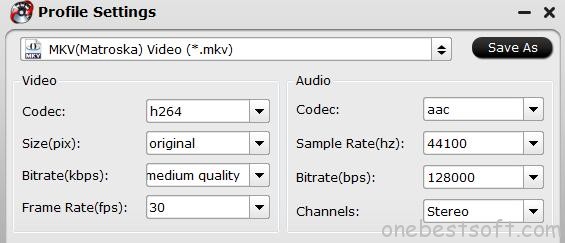
Click settings on the main interface to open “Profile Settings” window, under video section, click “Codec” drop-down list and select “H.264” codec to output H.265 MKV to H.264 MKV. You can also adjust other settings such as video bit rate, frame rate, resolution or audio codec, bit rate, sample rate or channels, etc according to your own needs.
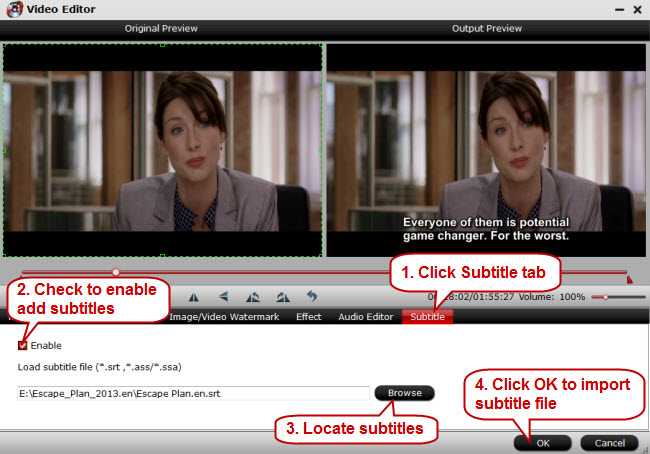
Step 3: Add external subtitles to output video.
If the original H.265 MKV files subtitles is damaged, you can download and insert external SRT/ASS/SSA subtitles to it. Click the “Edit” icon on the main interface to open “Video Editor” window, under the “Subtitle” panel, check “Enable”, then browse your local drive to import the “SRT/ASS/SSA” subtitles that you want to add to the output H.264 MKV video.
>
Step 4: Start the final conversion process.
Go back to the main interface, press “Convert” button in the right-bottom to start the conversion process.
When the conversion is done, click “Open output folder” to locate and find the generated files, then you will have no problem to play converted files with subtitles in Windows Media Player.


