


The high-resolution display for HD movies, TV shows or music videos on iPad Air will bring you perfect visual perception experience. Have stored so many video recordings from DSLR on DS214play NAS server? It will be a fantastic amusement to watch these precious high-bitrate footage on your iPad Air.

To play the DSLR movies and videos which are not in iPad Air H.264, M4V, MP4 or MOV format, you could utilize a powerful DSLR to iPad Air Converter to do the video conversion and then stream the videos to your iPad Air for playback.
According to iPad Air users’ needs, here recommend you Pavtube Video Converter Ultimate (For mac users: iMedia Converter for Mac) to finish this task. With it, you can batch convert any DSLR videos on DS214play NAS server(like MXF, MTS, MOV, MP4, XAVC, etc) to iPad Air playable format in extremely high quality at super fast speed with the CUDA/AMD technology support. Before conversion, it also helps you to edit the camera videos such as eliminating the shifting of the videos, adding the watermark and adjusting the effect. It can be taken as alternative to Media Converter and Turbo.264. Now free download the right version and follow the step-by-step guides below.
Convert and Sync Videos from DSLR on DS214play NAS server to iPad Air
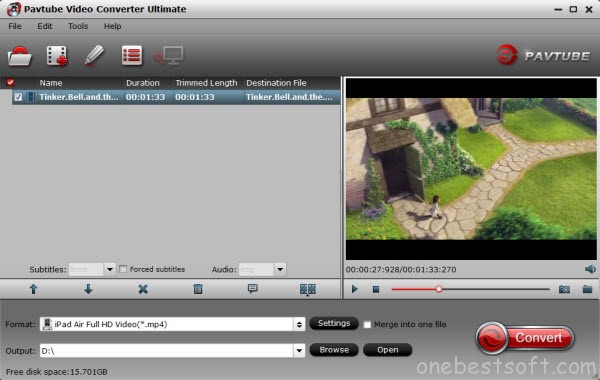
Step 1: Run DSLR to iPad Air Converter and import camera videos on DS214play NAS. Run the DSLR to iPad Air Converter. Click “Add Video” on the interface to import all video files you wish to convert to the program.
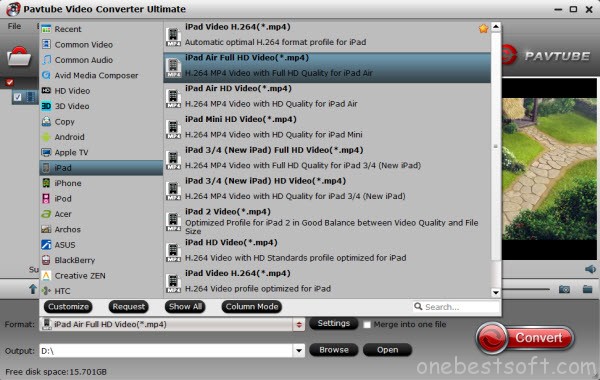
Step 2: Select an output format for iPad Air and set the output files. Click on the dropdown menu of “Format” and then tap “iPad” in the search box, after that, you will see several options such as “iPad Air Full HD Video(*.mp4)”, “iPad Air HD Video(*.mp4)”, “iPad Video H.264(*.mp4)”. Here we choose the iPad Air HD Video(*.mp4) to get HD video quality.
Afterward, you can set the output files by clicking “Browse” icon.
Step 3: Edit the DSLR videos.
If necessary, you can edit your Videos from DSLR on DS214play NAS server. Click the icon for file editing, and you will see a new interface named Video Editor. Now you can trim, crop, merge, insert subtitles, export srt/ass/ssa subtitles, add video effects in the destination movie.
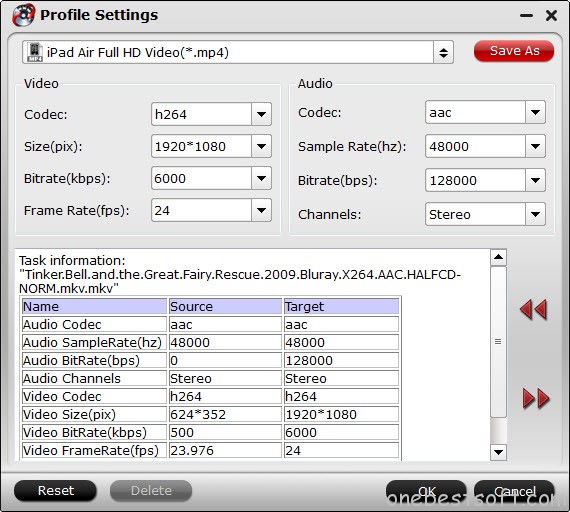
Step 4: Click “Settings” icon to adjust audio and video parameters.
Click the Setting icon to have the Profile settings box. In the setting interface, you are allowed to adjust codec, bit rate, frame rate, sample rate and audio channel to optimize the output file quality.
Step 5: Click the “Convert” icon to start the DSLR to iPad Air video conversion.
Click the “Convert icon, and the conversion will be started quickly. Once finished, you can get the output videos for your iPad Air via clicking on “Open” button effortlessly. Afterward, connect your iPad Air to PC and then sync the videos to iPad Air via iTunes.
Tips: How to add videos on computer to iPad Air?
To put videos to iPad Air, the latest iTunes 12 is a must. You can download iTunes from Apple and follow the steps below:
Step 1. Open iTunes, and press “File” > “Add File to Library” to add movies to iTunes Library. Copy the converted movies to iTunes movie library.
Step 2. Connect iPad Air with your computer, and you’ll find iPad Air in DEVICS section of iTunes source list.
Step 3. Check the converted movies for iPad Air in “LIBRARY”-“Movies” of iTunes list. To put videos or movies to iPad Air, just drag the movie you want to transfer to iPad Air in library list and drop onto “Movies” tab under “DEVICES- Your iPad Air” and it will sync movies to iPad Air soon.
iPad Air video playback is not limited to DSLR video, you can also put your DVD, GoPro and YouTube videos to iPad Air.


