


Have you collected 300+ or 500+ Blu-ray discs at home? If you are the Blu-ray movie fans, one NAS you need to know and have: DiskStation DS1517+, the new Synology NAS, you can expand the storage from 50TB to a maximum of 150TB using 15 drives via two DX517 expansion units. Owning it and backup 300+ Blu-ray to DiskStation DS1517+ for clearing much space for your room. At the same time, you can get rid of the heavy Blu-ray player, even you are outside, you can stream the Blu-ray movies to PC, iPad, or other devices by Plex or Kodi from the DiskStation DS1517+.
The DiskStation DS1517+ is ready, 300+ Blu-ray discs are ready, then how to get rid of the Blu-ray disc and backup Blu-ray movies to DiskStation DS1517+? You need a third Blu-ray ripper which can convert Blu-ray to digital video formats, them you cna upload the multiple Blu-ray movies to DiskStation DS1517+ easily. This post is your benefit, you cna find the best and reliable Blu-ray ripper and comprehensive steps for converting Blu-ray discs quickly.
Necessary Blu-ray Ripper: Backup Blu-ray to DiskStation DS1517+
Mention the Blu-ray ripper, some users like to choose Handbrake which is a free and open source software, but you only can load the unprotected Blu-ray to Handbrake. Some users like MakeMKV(Best Alternative to MakeMKV for Mac) which is free too, if you don’t care the single MKV video format, it;s really a good choice. Most users like the powerful Blu-ray ripper which can remove the Blu-ray copy protection, provides various video formats, easy to use, etc. We have found the real hero you want: Bytecopy (Review).
Bytecopy is the dream tool you are looking for. It can remove Blu-ray region code, AACS, BD+, RC, BD-Live, UOPs and other Blu-ray copy protection, provides 200+ video formats for you, like: MP4, H.265, H.264, AVI, MOV, WMV, MKV, FLV, etc. In the user-friendly interface, you can choose the forced subtitles and languages for output video.
You not only can choose the video format, you can get the video with different quality you like: SD video, HD video, 4K video, 3D video you can find all in this software. It’s really convenient for you to play precious Blu-ray movies on 3D glasses or VR headset: HTC Vive, Gear VR, PS VR, Oculus Rift CV1, HD TV or 4K TV: Apple TV 5, LG 4K TV, Samsung 4K TV, etc. For Mac users, you can install this software on and Mac (Including the latest macOS High Sierra).
How to Convert Blu-ray to DS1517+ With 3 Clicks?
Click 1. Load the Blu-ray disc
Open this software with double click and choose “File” to load the Blu-ray discs. You also can drag the Blu-ray movie to the Blu-ray ripper directly. At the right window, you can play the Blu-ray video and adjust the video volume, but you can’t play the Blu-ray video with full screen, a little pity.

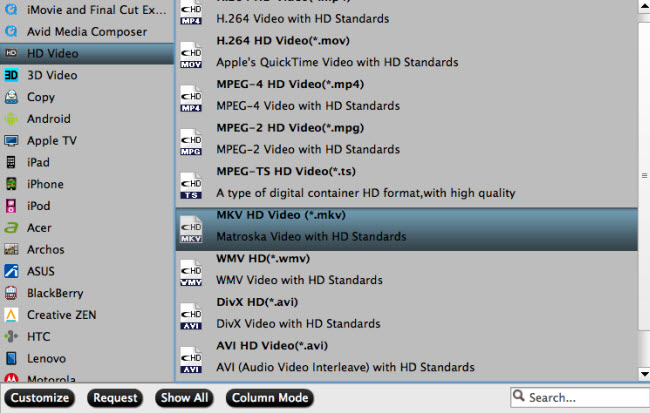
Click 2. Choose output video format
When you load the Blu-ray movies, you can click Format and open the output video format list. You can convert Blu-ray to digital videos for save much Blu-ray storage space. When you upload the digital Blu-ray videos to DS1517+ , you can stream Blu-ray from DS1517+ to PS3, PS4, Xbox One, iPad, iPhone 8/7, etc.
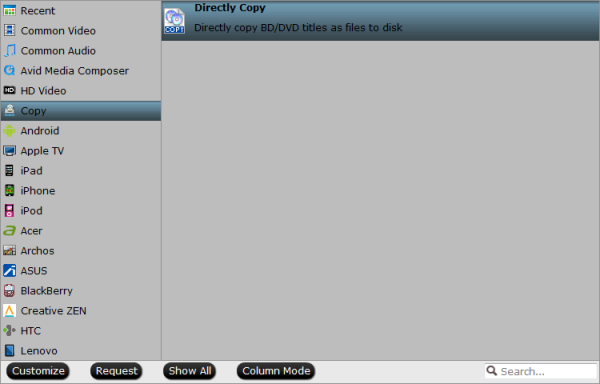
Some users like the Blu-ray disc and collect the disc. Here, you can do some copies by 2 ways: Bytecopy allows you to copy the full Blu-ray disc and Blu-ray disc main title. Like the following: You can Click ![]() on the top of the menu and copy the full Blu-ray disc. You also can backup Blu-ray main title which won’t affect you to play Blu-ray movies. Click “Format” > “Copy” > “Directly Copy”
on the top of the menu and copy the full Blu-ray disc. You also can backup Blu-ray main title which won’t affect you to play Blu-ray movies. Click “Format” > “Copy” > “Directly Copy”
Step 3. Start to copy Blu-ray to DS1517+
After choosing the right Blu-ray backup option, user need to go back to the main interface, and click “Convert” button to start the Blu-ray backup conversion.
Is it so easy to do? just 3 clicks, within 5 minutes, you can get your precious movie from Blu-ray disc. You even can do the batch video conversion, but you need to connect many external Blu-ray drive to your PC. By the way, if you just bought the new DS1517+, you can finish the DS1517+ installation in 15 minutes. 6 steps, you can be a professional DS1517+ user.
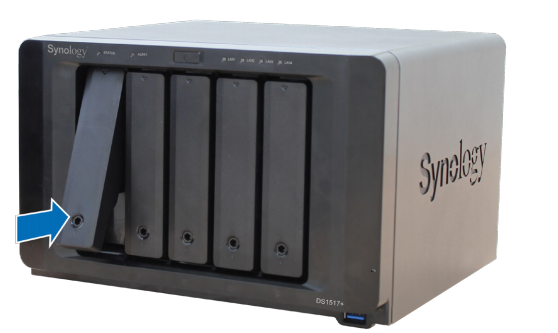
| Step 1 | Step 2 | Step 3 |
|
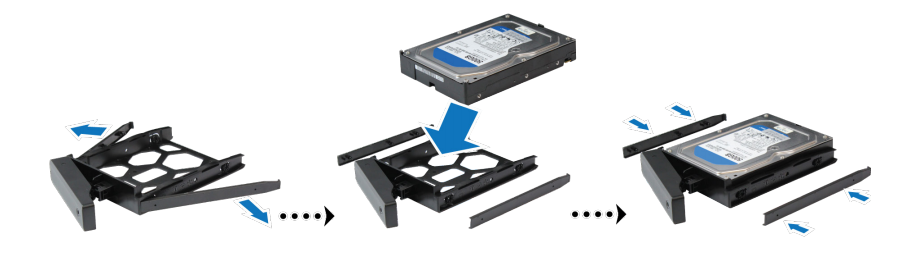
Press the lower part of the hard drive tray to pop out the handle. |
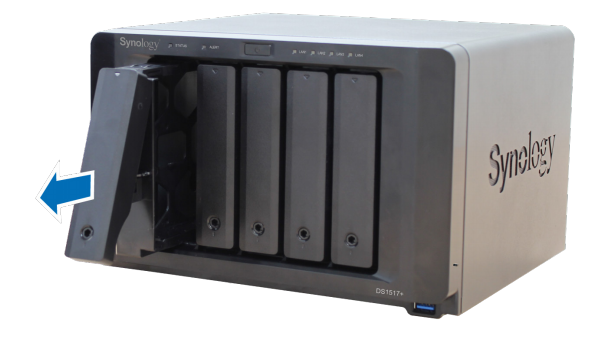
Pull the hard drive tray handle in the direction as indicated below to remove the hard drive tray | Load drives in the drive trays: Place the drive in the drive tray. Then tighten the screws to secure the drive in place. |
 |
 |
 |
| Step 4 | Step 5 | Step 6 |
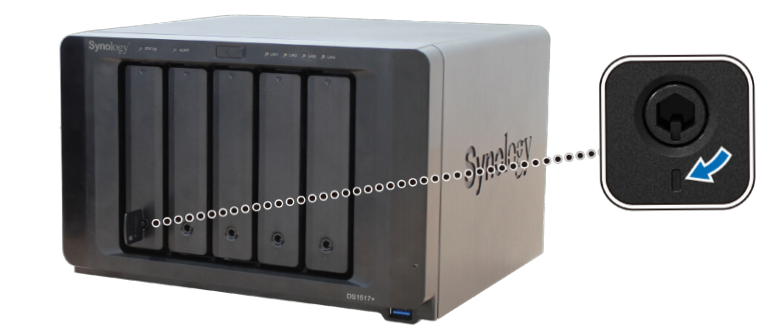
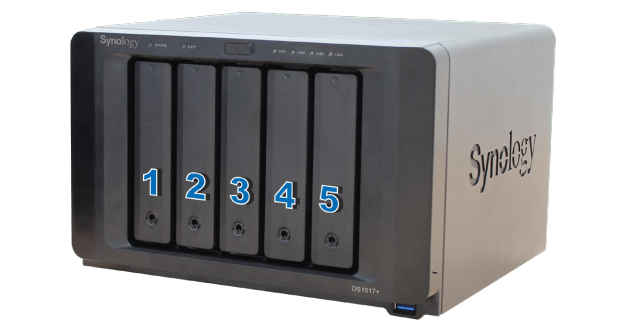
| Insert the loaded hard drive tray into the empty hard drive bay | Insert the hard drive tray key into the hard drive tray lock, turn the key clockwise (to the “I” position) to lock the handle of the hard drive tray, and then remove the key. |
Repeat the steps above to assemble the other drives you have prepared. |
|
 |
 |


