


You will be stressed if you love to collect DVDs and you actually did it with a naughty kid at home. Kids are the enemy of fragile DVDs. They will be glad to turn the expensive DVDs into the gloried frisbees from your sight. Now, there is a way to let you free. That is to backup your DVDs, aka rip DVD, copy DVD, decrypt DVD. 
DVDs stand for Digital Versatile/Video Disc. It is copy protected which means you can’t play DVD movies on devices without DVD player not only for the “Disc Format” but also for the encryption. This protection machenism also prevent you from making a backup of DVD movies. Then the DVD Ripper comes on stage.
What is DVD Ripping
DVD Ripping is the process of copying audio or video content to a hard disk, typically from removable media such as compact disc (CD) or DVD, although the word refers to all forms of media. Despite the name, neither the media nor the data is damaged after extraction. Ripping is often used to shift formats, and to edit, duplicate or back up media content.
Best DVD Ripping Software
WinX DVD Video Software – is a Windows-based DVD ripper software capable of ripping any DVD (even the latest strongly encrypted DVD discs/ISO images) to mainstream videos, such as rip DVD to AVI, DVD to MP4, H.264, MPEG, WMV, MOV, FLV and M2TS. It also helps faultlessly convert DVD to Apple (iPhone, iPad, iPod, Apple TV, iTunes), Android (Nexus, Samsung, HTC, Kindle Fire), Microsoft (Windows Phone, Surface, Xbox), Chromecast, Sony, Nokia, etc.
Pavtube Video Converter Ultimate– Not like WinX DVD Video Software, Pavtube Video Converter Ultimate is designed for all media files: DVD, Blu-ray, 4K, 3D, SD, HD video files. It easily can decrypt DVD and shift format, meanwhile, it also can rip Blu-ray to hard disc and convert video to anoter format encoded in different video codec. Comparing with WinX DVD video software, Pavtube product also has an unique feature: Media Server, with which you can play your video directly on your iPhone and Adroid devices by scanning QR code and stream movies on TV by tapping into the IP address with remote control.
WinX DVD Ripper vs Pavtube Video Converter Ultimate: Basic Function Comparison
| Software | WinX DVD Video Software | Pavtube Video Converter Ultimate |
|
Supported Input Files |
||
| Blu-ray | NO | YES |
| DVD | YES | YES |
| Video | NO | YES |
|
Supported DVD Copy Protection |
||
| CSS encryption, region code, Sony ARccOS, UOPs, APS, RCE | Only Platinum Edition | YES |
| Disney X-project DRM – the new encryption method adopted by Disney, Paramount and Warner. | Only Platinum Edition | YES |
| Constantly update to support the latest DVDs. | Only Platinum Edition | YES |
|
Output Files Supported |
||
| MPEG, WMV, FLV, MOV, MP4/H.264 | YES | YES |
| HD MP4, MKV, AVI | NO | YES |
| 3D MKV, MP4, AVI, MOV | NO | YES |
| 4K MKV, MP4 | NO | YES |
| Built-in profiles for popular devices | YES | YES |
|
More Features |
||
| DVD to ISO | YES | YES |
| Media Server | NO | YES |
| Built-in Video Editor | YES | YES |
From the chart above, you can see clearly that Pavtube Video Converter Ultimate has more functions than WinX DVD Video Software. What is worth mentioning, Pavtube product is more than a DVD Ripper, DVD Copier. With it, you can transfer the converted video to iPhone 7, Galaxy S7, Surface Pro 5, Sony Xperia XA by stream media on HD TV, PS4, PS3 through tapping into the IP address without needing the USB cable and HDMI cable. More functions can be learned in its review. If you get interested, just read it.
How to Copy DVD With Pavtube Video Converter Ultimate
Step 1: Download, install and open Pavtube Video Converter Ultimate.
Step 2: To load DVD movies, you can click “Add DVD”icon at the top of the interface. 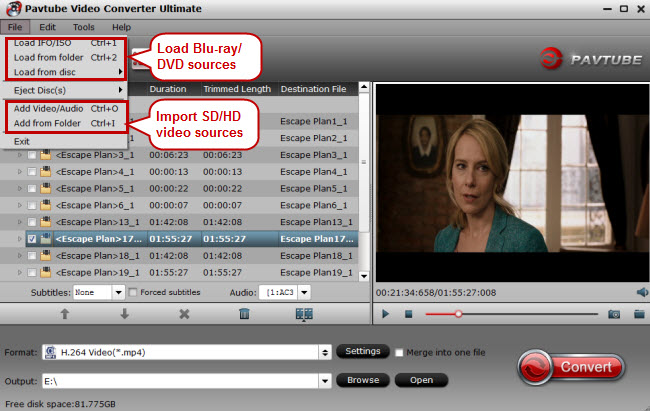
Step 3: Click “Select Format” to choose your desired output video and audio format. You also can choose some optimized preset from “Device” profile to get the most compatible digital video for your devices.
Step 4 (Optional): You can edit your DVD movies according to your need. To edit the video file, click on the “Edit” button. Clicking on this button will open a new editing window from where you can apply the required effects.
Step 5(Optional): To define a custom format, you can click on the “Settings” button. This will open a new window where you can choose your needed A/V parameters and press “Ok”.
Step 6: After all the above settings, the next step is to specify the output folder for the resultant file. You can either keep the default output folder or specify another one according to your requirement.
Step 7: The last step is to hit on “Start” to begin to converting DVD movies to the digital files you selected. The converting time relies on the size and your bandwidth.
Finally, open output folder to locate the generated DVD rips. Or you can switch to Media Server and scan the QR code with your portable devices to play the DVD movies directly. If you want wide screen, input the IP address to your TV with remote control to view DVD movies on HD TV.
Related External Source Wikipedia


