Are you a music guy? If you are fascinated by the way great editors can maximize the emotional effect of the scenes or transitions, I bet you will get your wonderful Blu-ray movies imported and edited in Final Cut Pro for using some of the video in a project at first. However, you will find every time when you tried to put your Blu-ray to FCP, you will receive an error code. Why? It is because Final Cut Pro does not support directly Blu-ray importing.

Fortunately, for those who want to import Blu-ray to Final Cut Pro for editing, there is an easy way to fix this problem. What you need is a professional Blu-ray to FCP converter that is best suit your Mac computer and a BD drive. As far as I know, Pavtube BDMagic for Mac will be a great helper, which enables you to easily rip and convert Blu-ray to Final Cut Pro friendly video format for importing and editing in one fell swoop. With a much-needed injection of new features and overhauled interface, you will surely enjoy an easy but fresh new Blu-ray ripping experience with this Mac Blu-ray ripper. (Read Review: Top 5 Best Selling Windows/Mac Blu-ray Rippers)
Note: For people who want to edit Blu-ray in FCP keeping the multiple audio/video track separately as original, Pavtube ByteCopy for Mac is a powerful tool to transcode Blu-ray to multi-track Apple Prores codec. Suppose you are good at both English and Francia, and want to preserve both of them from original Blu-ray discs when converting, this app will be your best choice. (Here is a detailed guide for you)
The following steps will show you how to import and rip Blu-ray movie to Final Cut Pro on Mac. After the simple and clear instructions, you would find it really easy to finish Blu-ray to FCP conversion on Mac.
Guide to Import and Rip Blu-ray to Final Cut Pro on Mac
1. Download Pavtube BDMagic for Mac.
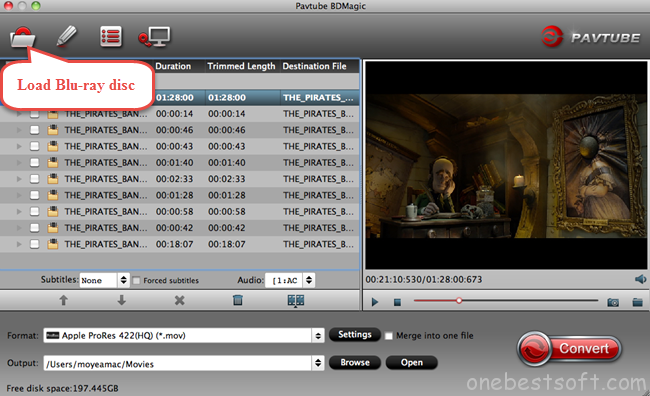
2. Install and launch this Blu-ray to FCP Converter. Import Blu-ray video from BD drive to the converter by clicking “load file(s)” botton.

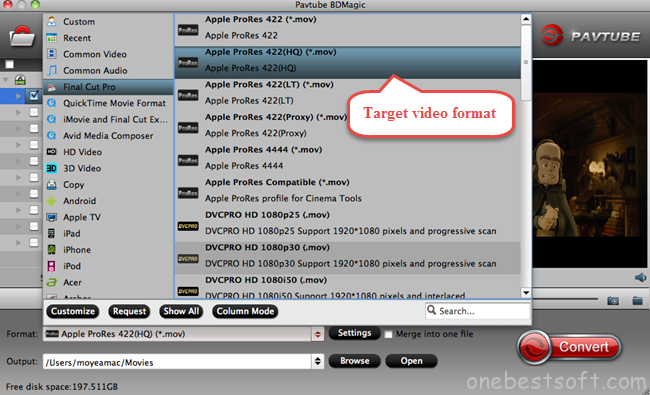
3.Click Format bar to choose the output format. Click and choose Final Cut Pro -> Apple ProRes 422(HQ) (*.mov).

Regarding output files, it depends, you can select the output format according to your own situation.
- Apple ProRes 422 – Higher quality than Apple ProRes 422 (LT);
- Apple ProRes 422 (HQ) – Keep original video quality for editing in FCP;
- Apple ProRes 422 (LT) – Get a smaller file sizes than Apple ProRes 422;
- Apple ProRes 422 (Proxy) – SD levels – 480i/p and 576i/p. Used in offline workflows.
- Apple ProRes 4444 – Edit and finish 4:4:4 material.
For more info, read types of Apple ProRes Codecs.
Here is my experience:
If I wanted to edit sections of movies for my own use rather than the entire movie, I’d use AppleProRes – which is larger file size but can be easily edited – what I use for the videos I’m working on to support an album release.
If I were backing up or digitize the entire movie, or existing chapters, I’d use the same existing codec H.264 or whatever, something that doesn’t compress too much, but also uses less disc space.
- Also learn how to rip clips from Blu-ray to HD MP4 for playback or to AIC for iMovie editing.
4.You can click “Settings” to customize the output parameters, adjust the resolution, bitrate as you want. (Optional)
5.Click convert button to start Blu-ray to ProRes 422 conversion, after conversion, run FCP on your Mac, and click “File” and “Import” to load the converted video to Final Cut Pro.
With this Blu-ray to FCP Converter, you’re closer to your Hollywood dream. It delivers significantly improved performance on the accessibility to the latest copy protected Blu-ray as well DVD movies.
Kindly note: Pavtube BDMagic for Mac is also a video editor, to active it, just click the pencil form icon to get into the editing interface and you’re allowed to trim your favorite movie clips, remove unwanted areas like black bars, add watermarks, insert subtitles, etc.
Have DVD discs? Import DVD to Windows Movie Maker! Have all kinds of movie files? Start to convert AVI/WMV/VOB/FLV files to FCP X! Hope you have a wonderful editing workflow!


