iTunes store is one of the most popular online sources for buying and downloading your favourite movies, but it does not mean you are limited to iTunes to enjoy your iTunes purchases, if you are going to share and enjoy iTunes collection with Windows Media Center, you are in the right place. Here shows you how to stream and add iTunes media library to WMC with ease.
Hot Topics: Alternatives for WMC | DVD to Windows Media Center | Blu-ray to Windows Media Center

When putting purchased iTunes contents to Windows Media Center for backup or unlimited playback, you may get an warning which says: “Windows media center cannot find the specified file. Make sure that the path is typed correctly. If it is the file does not exist at the specified location or the computer where it is stored is offline.”
In this case, you need to install a codec pack such as CCCP or K-Lite to get your iTunes movies playable on WMC, and the other possibility is that the file has DRM on it, which means you wont be able to play it anywhere. What’s the matter?
1. M4V movies and TV shows bought from iTunes Store are protected by Apple’FairPlay. Due to the Apple DRM protection, your purchased or rental videos and movies from iTunes store can only play on Apple devices, like iPhone 6 Plus, iPhone 6, iPad Air 2, iPad Air, iPad Mini 3/2, iPad 4, iPad 3, iPod, Apple TV 3, etc. or video players.
2. Most iTunes videos are in M4V format while Windows Media Center prefers WMV, the M4V format is the Windows Media Center incompatible file format.
P.S. Some green hands of Windows Media Center(WMC) may have the confusion of the default supported video and music formats of WMC. Here we list below.
For Video:
- Windows Media Files – wm, asf, wmv
- AVCHD files – m2t, m2ts
- Apple QuickTime Files – qt, mov
- Audio Visual Interleave – avi
- Windows Recorded TV Show Files – dvr-ms, wtv
- Moving Pictures Experts Group – mpeg, mpg, mp2, mp3, m1v, mpe, mpa, m3u, mpv2, vob, mod
- MP4 Video Files – mp4, m4v
For Audio:
- Windows Media Audio Files – wma, wmx, asx, wm
- Windows Audio File – aac
- MP3 Audio files – mp3, m3u
- Audio for Windows – wav
Since iTunes movies are protected and the file formats are not supported by Windows Media Center, in order to make iTunes work with Windows Media Center, you need to remove DRM from iTunes M4V videos and convert iTunes DRM contents to Windows Media Center acceptable format is needed. And this is possible by the use of an all-in-one DRM removal and video converter – Pavtube ChewTune.
With this simple settings, high speed, and friendly interface’s iTunes to Windows Media Center conversion software, you can easily convert your iTunes media contents, either plain files or DRM-protected files, to Windows Media Center playable video formats. The app is also able to convert any audio to the most common and popular audio formats, such as WMA, AAC, WAV and MP3 formats that you can enjoy high quality songs on WMC’s music library. More, you will be able to customize several parameters like sample rate, bit rate and audio channel. Moreover, the iTunes to WMC Converter supports batch conversion. Here I will guide windows users how to bypass the DRM protection and watch iTunes movies on Windows Media Center freely.
Free download iTunes to Windows Media Center converter:
Note:
1. Make sure that your computer is authorized for source videos, that is to say you can play the source iTunes movies in iTunes.
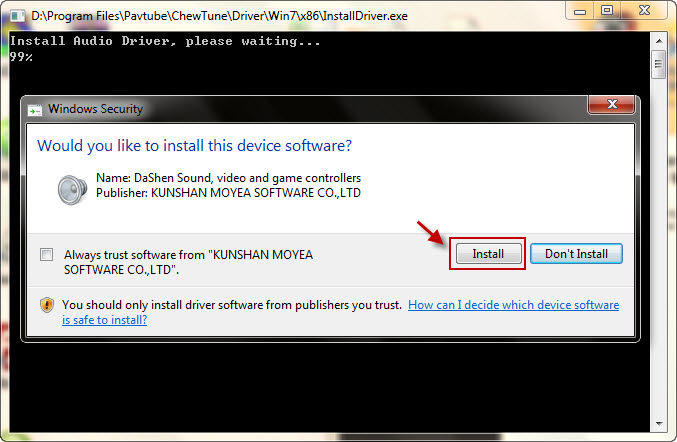
2. Allow the audio driver installed during the Pavtube ChewTune installation.

Once you’ve download it, double-click on the file to install it to your computer following the on-screen installation instruction. Just two clicks, everyone can become the master, let’s start…
Remove DRM and convert iTunes to Windows Media Center supported format
Step 1: Add iTunes source files.
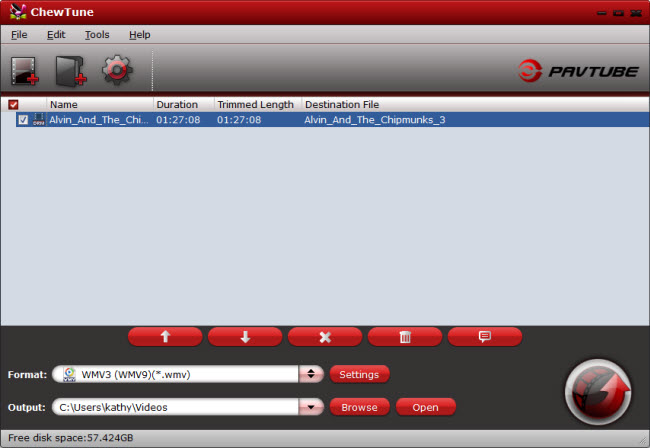
Launch the best iTunes to Windows Media Center Converter. Click on the “Add…” button at top left of the software’s main screen, navigate to the iTunes folder on your computer, choose iTunes videos from it and click “OK”. Batch conversion is supported to save time, so you can add multiple files at once.

Step 2. Select output format and the output path.
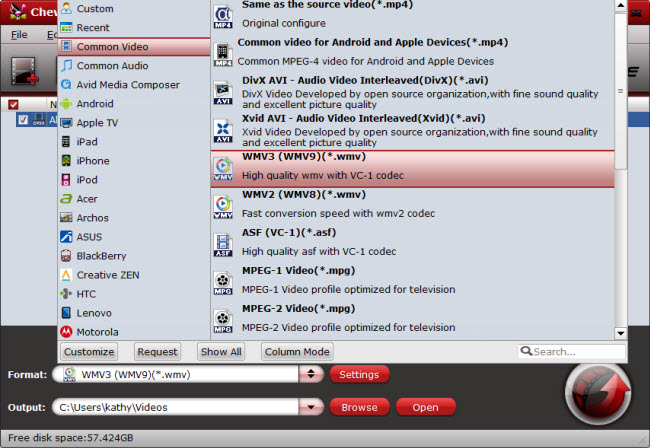
Click “Format” bar and move mouse to “Common Video” column, you can easily find WMV or AVI which is accepted by Windows Media Center. Don’t forget to set the output path for the converted files. By clicking on the “Browse” button, you can customize the output path.

Tip: If you like, you can also click “Setting” to choose any output format of audio or video according to your digital player’s need and set the video parameters (such as resolution, frame bite, encoder and bit rate) or audio parameters (such as sample rate, channel, encoder and bit rate, etc.) if you don’t like the default settings.
Step 3. Start iTunes to Windows Media Center conversion
The final step is to click on the “Convert” button and wait for the iTunes M4V to WMV conversion to be done. Once the conversion finished, click “Open” button and you can locate the output files. Then launch Windows Media Center and add your DRM-free videos to WMC. Just do it!
Some Tips when recording iTunes to Windows Media Center:
1. Close iTunes before running Pavtube ChewTune when converting iTunes M4V movies.
2. It would take as long as the source movie length for the whole DRM video recording process since Pavtube ChewTune records source DRM videos in 1:1 video and audio quality.
3. You can extract WAV, AAC audio from iTunes videos. Just select the Audio format from “Common Audio” as Windows Media Player supported audio file type in step 2.
Instructions for streaming DRM-free iTunes music to Windows Media Center:
- Launch Windows Media Center.
- Scroll to “Tasks” on the Windows Media Center main screen.
- Click “Settings,” found by default to the left of the scroll bar.
- Click “Manage Libraries.” If this is the first time you have run Windows Media Center, the link will read “Library Setup” rather than “Manage Libraries,” but the effect is the same.
- Click “Add Folders,” then click “Next” at the bottom of the screen.
- Click “Add Folders on This Computer,” then click “Next.”
- Navigate to the folder where your iTunes music is stored. By default, it is located in your Music folder in a subfolder called “iTunes.” When you have found the correct folder, click the check box next the folder name and click “Next” at the bottom of the screen.
- Click “Finish,” and Windows Media Center will begin indexing all the media it found in your iTunes collection. Within a few minutes, you will be able to view, edit and play all of your iTunes music in Windows Media Center.
How to Backup and Play unsupported video files in Windows Media Center
If you’re going to backup H.265/HEVC video, 3D/4K video, MKV, MOV, Blu-ray, DVD to Windows Media Center, you can get Pavtube Video Converter Ultimate to encode videos to WMC for playback smoothly.
Continue Reading:


