


During the video recording and video sharing, video editing is necessary, you can edit the video for better video effect, at the same time, you also can attract more viewers. For some video editing beginners, Windows Movie Marker is the best option, you can edit the video quickly. You need to install it on your PC, before the video editing, you need to import the videos to Windows Movie Marker smoothly, some video are supported by WMM, some not, you can check the video formats and add the videos to WMM successfully by the below steps.
Windows Mover Marker Supported Video Formats
- Windows Media Video files: .wmv, .asf and .wm;
- AVCHD files (from digital camcorders): .m2ts, .m2t and.mts;
- Apple QuickTime files:.qt and.mov;
- MPEG (1, 2 and 4) files: .mp4, .mov, .m4v, .mpeg, .mpg, .mpe, .m1v, .mp2, .mpv2, .mod, vob and .m1v; AVI files;
- Recorded TV shows (Microsoft): .wtv and .dvr-ms;
- Audio files: .wma, .asf, .wm, .aif, .aiff, .wav, .m4a and .mp3.
Add Supported Videos to Windows Movie Marker
Options 1. Add videos to WMM directly
1. In Movie Maker, on the Home tab, in the Add group, select Add videos and photos.
2. In the Add Videos and Photos dialog box, open the folder that contains the photos or videos that you want to add, select the video files and photos, and then select Open.
3. To select multiple photos and videos, press and hold the Ctrl key, and then select each photo and video you want.
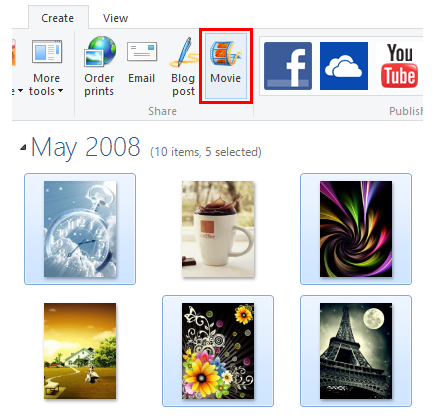
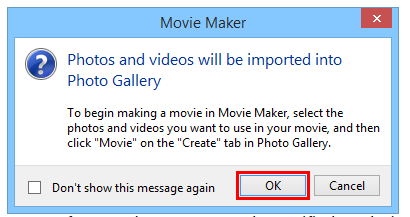
Options 2. Add videos to WMM by Photo Gallery
1. In Photo Gallery, select the videos and photos that you want to use in your movie.
2. To select multiple photos and videos, select the check box in the upper-left corner for each photo and video you want
3. On the Create tab, in the Share group, select Movie. Movie Maker opens automatically, and the selected photos and videos are added to the storyboard.
Add Unsupported Videos to Windows Movie Marker
Some video formats are not supported by Windows Movie Marker, you need to get the video converter and convert the video to Windows Movie Marker supported video formats. If you are the DVD and Blu-ray fans and want to edit the video for sharing, I think the Pavtube Video Converter Ultimate is the best option which allows you to add the common videos, DVDs, Blu-ray disc to it and get the best video formats from the 300+ video formats, like the MP4, WMV, AVI, MOV, H.264, H.265, FLV, etc.
For some professional video editor, you may use the FCP, iMovie, Avid MC, Sony Vegas Pro 13, Pinnacle Studio, Sony Movie Studio, etc, no problem, you also can get the best video formats from the NLE software. You also can choose the NLE preset from the output video list. Benefit: You also can edit the video in the video editing window, for example: You can split the video into clips, cut the video for short length, add subtitles to video, add music to video, etc.


Step 1. Open this video converter
Open this video converter and the user-friendly interface, you may love it. Then you can drag the video files to the video converter, you also can click File and add the videos. Best of all, you also can add the folder and do the batch video conversion.
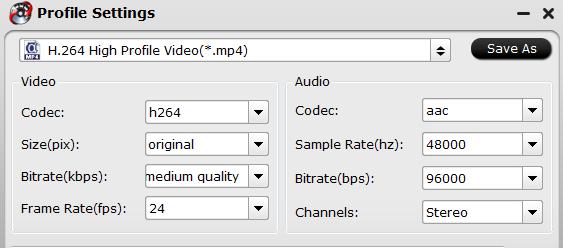
Step 2. Choose output video formats
Click the Format button and choose the output video formats, you can choose video from the Common Video or HD Video. When you choose the video in h.264 and h.265 codec, you can get 30x faster speed than other common video converter, this video converter takes full use of the GPU acceleration technology.

If necessary, you also can adjust the video parameters, like the video resolution, you can upscale the common video to 4K videos or compress the 4K video to HD video. When you want to upload the video to Youtube, Facebook, etc, most of them limit the video frame, you also can adjust it too. Other audio parameters you also can do.
Step 3. Start the video conversion
Go to the main interface and click the Convert button to start the video conversion.
By the way, you also can edit the video in the video editing window, it’s easy to do, if not, you can import the videos to Windows Movie Marker for editing.


