People are itching to save all movies and videos in MP4 format on their hard drives. But a big MP4 video always causes trouble. The following paragraphs will show you ways and tips to resize MP4 video on Mac/Win so as to save your space, no matter for uploading online, sending via email or fitting the small-screen when playback.

Why we need to Reduce MP4 File Size?
We are often asked the following questions related to compressing MP4 files:
- I have a monster 4GB folder full of .MP4 files shot on my camera that I need to compress small enough to fit on my small-screen phone to ensure a successful playback of my high-resolution MP4 video. However, I don’t really know how to do it.
- I have a MP4 file with nearly 1 GB size, how can I shrink MP4 video for smaller size or convert it to other format without losing the quality since it will be easy to e-mail an MP4 video clip with smaller size to friends.
- I have several videos in .mp4 format I want to upload to YouTube. They are all about 500MB. As it is now, it takes over an hour to upload each video although it is one of the best YouTube upload formats.
From the above examples, we can conclude the three main reasons that people want to compress a MP4 file: free their disk or SD card space, save the time it takes to upload a MP4 file and successfully send MP4 files via E-mail.
How can we compress a .MP4 file
The following step by step guide is the answer to all the above questions, which offer three methods to make your MP4 file smaller with no quality loss with the help of an MP4 video compressor for Mac/Win- Pavtube iMedia Converter for Mac/Video Converter Ultimate.
This converter does a good job in compressing MP4 video as well as keep the source format or convert to other more compatible video or audio formats as your desire. One thing needs to be mentioned, the boasting of high quality engine will ensure a 98% quality reservation even if you conduct the MP4 compression to make it smaller using the MP4 resizer. Therefore, you can upload it to Youtube, email to your friend or playback on phones fast with crisp image; Compatible with both Mac OS X (El Capitan) and Windows (Windows 10). Various hot edit features is supported: trim, rotate, crop, merge files into one, add subtitles/watermark/effect, remove audio from video, take snapshot, split, change bitrate/sample rate/video size and more; Except compressing MP4 files, this useful MP4 Compressor for Mac/Win also supports reducing almost all kinds of video files size such as compress MOV files, compress AVI files, compress FLV files, compress M2TS files, compress MKV files, compress WAV MP3 audio files, etc.
Download and install it now and then only follow the three steps to finish MP4 compression on Mac/Win.
Other Download:
– Pavtube old official address: http://www.pavtube.cn/imedia-converter-mac/
– Cnet Download: http://download.cnet.com/Pavtube-iMedia-Converter/3000-2194_4-76177788.html
Step 1. Import MP4 Videos
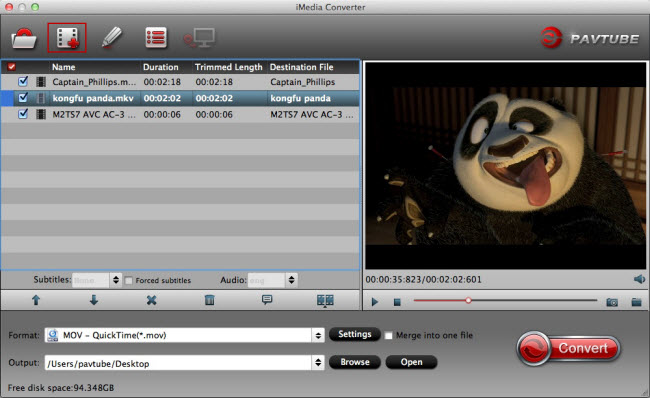
Launch the best MP4 file size reducer for Mac/Win, and hit the “Add video” button to import your video file. Simply dragging and dropping MP4 files to the main interface is also allowed.

Step 2. Compress MP4 file
Here are the three methods to compress a MP4 file:
a. Compress MP4 to a Smaller-Sized FLV, WMV
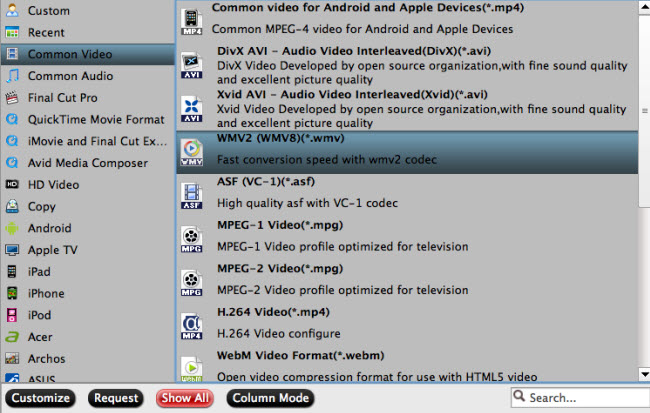
Since WMV and FLV provide relatively small size for uploading or playing. If you hope to compress MP4 format, it’s advised to convert MP4 to WMV or FLV to reduce MP4 file size using a professional MP4 video converter. Click the drop-down button of “Format” to select WMV or FLV as output format from “General Video” category.
- See also MPEG Compression Standard

Tips: this method only applies to MP4 files which are not encoded with H.264 video codec.
b. Change Parameter Settings, Incl. Video Resolution, Frame Rate and Bit Rate
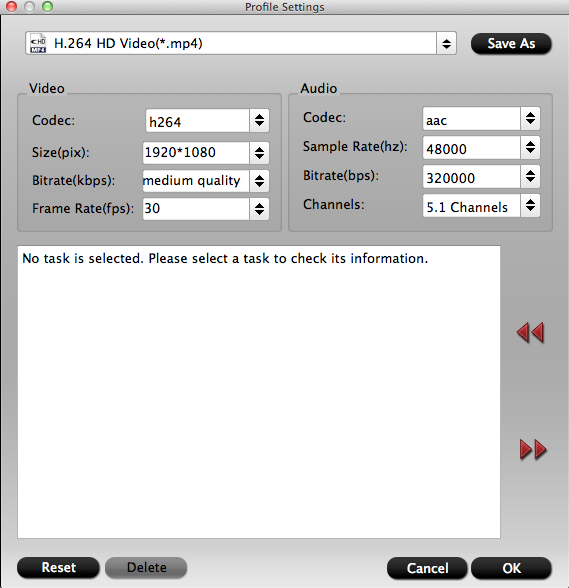
Click “Setting” button of the program and a window will pop up. From Size(pix) drop-down list, select an appropriate parameter or enter a desire value for output file. Or choose lower value from the drop-down list of the right side of “Bitrate” to decrease MP4 Bitrate in order to resize your MP4.

Tips: The more you reduce the video size and Bitrate, the worse the video quality you will get, so do not reduce too much.
c. Trim Unwanted Part to Downsize MP4 Video File
You can either split the video file into multiple segments or cut off the unwanted clips with the built-in editor to get the video size compressed.
Step 3. Now hit the “Convert” button on program UI and start compressing and encoding. Once it completes, get the created file you are ready to uploading, emailing or watching with high output video quality.
The MP4 resizer for Windows will transcode the MP4 video clips with top speed with the help of NVIDIA CUDA and AMD APP acceleration. I had been using the Wondershare Converter and while it works, it really ate up a bunch of my memory and I have 32 Gb of Ram and thought it was not right. Pavtube product works quicker and doesn’t use nearly as much memory. Plus, Pavtube provides excellent customer support service, including lifetime free upgrade of product and technical support. Users can contact the support staff via email for help and suggestion. Read details in this comparison.
Other Alternatives to Compress MP4
1. Reduce video size with Windows Movie Maker: Import the MP4 to be resized once you open the Movie maker, put it into the movie maker tineline, open the “Save Movie” wizard and select the desired file size for the finished video file on your computer.
2. Shrink the size of video with iMovie: Import your MP4 file into iMovie by clicking and drapping the file’s icon into the right panel of iMovie, click and drag it again down into the timeline at the bottom of the window, select “Export using QuickTime”, click “Options” to choose desirable format, date rate, frame rate, etc, then click “Export” to finish video size reducing.
3. Downsiz MP4 with QuickTime Player Pro: Click “File” and “Open File” to locate your MP4 and open it in QuickTime. Then click “File” and select “Export” to enter the “Save Exported File As” menu. Choose “Movie to MPEG-4” in the “Export” menu bar. Click “Options.” Change your file format to “MP4” instead of “MP4 (ISMA).” This will cut the file size roughly in half. Change your “Video Format” to “MPEG-4 Basic.” Choose your “Image Size” and click “OK.” Rename your file, if desired, and click “Save” to begin the compression. This may take several minutes depending on your file’s size. (Here is details)
4. If you want a free and common video converter to achieve your conversion and compression task, turn to these free Video Converter for Mac/Win, however, if you care much about the video output quality, conversion speed, Pavtube is your best solution.


