For those people who pursue for high quality sound experience, you will have great preference for Blu-ray audio, which can deliver lossless audio quality thanks to its large capability. The following article will explain the mainly three Blu-ray lossless audio formats and also show you how to rip Blu-ray with lossless audio well preserved with the best lossless Blu-ray audio extractor on macOS High Sierra.

Blu-ray lossless audio formats
There are mainly three lossless audio codecs used in Blu-ray disc: PCM, Dolby TrueHD and DTS-HD MA.
PCM: PCM, short for Pulse Code Modulation, is also called LPCM, Linear PCM, or Uncompressed. It encodes the original master without any compression. Therefore, it takes up large amount of Blu-ray disc space. However, it carries three fronts, four surround and a low frequency effect channel at higher sampling rates and bit depth.
Dolby TrueHD: This format uses lossless compression so the audio information takes up less space on the disc than a PCM file, but no sound quality is lost in the compression process.
DTS-HD Master Audio: DTS-HD consists of two streams: a “core” with a high-resolution (but lossy) DTS track and a DTS-HD MA (Master Audio) track. The MA track is a lossless track capable of duplicating the studio master tape. Like Dolby TrueHD, DTS-HD takes up less space on a disc than uncompressed PCM. Compared to Dolby TrueHD, fewer Blu-ray players decode DTS-HD MA. This is because DTS-HD MA requires more processing power than Dolby TrueHD, so you are usually looking at a higher-priced player. Two players that decode DTS-HD MA are the Panasonic DMP-BD55 and Sony BDP-S550.
Tips: For people who don’t plan on upgrading your sound system to experience lossless audio, most Blu-ray movies have a standard Dolby Digital track, just like DVDs. It is a higher quality recording than you find on DVDs, so it will definitely sound better than you are used to but it won’t duplicate the quality of the lossless tracks. The DTS core found on DTS-HD discs is very high quality, too.
Hot Search: Keep Blu-ray Dolby TrueHD 7.1 | Blu-Ray Pure Audio to iTunes | Rip Blu-ray with DTS-HD MA
Preserve Blu-ray lossless audio on macOS High Sierra
To extract lossless audio formats from Blu-ray movies, you will need a program which can powerfully pass through all the Blu-ray lossless audio formats listed above. For Mac users, we highly recommend Pavtube ByteCopy for Mac (review) to you, which has perfect support for the new macOS Sierra. It can powerfully bypass all Blu-ray copy protection and region codec from the disc, then you can feel feel to extract the content on the disc without any limitation. The program can do you favor to keep all the lossless Blu-ray audio formats including Dolby Digital/DTS/PCM/Dolby TrueHD/DTS-HD MA in original Blu-ray disc, BDMV folder/ISO image file by outputting Blu-ray to a lossless Multi-track MKV format.
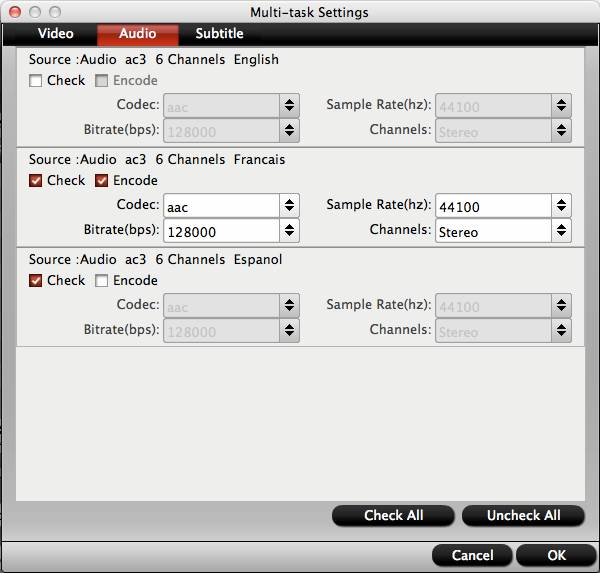
When you use the program to output the lossless/encoded multi-track MKV format, all the audio tracks in original Blu-ray source file will be preserved. If there are some audio tracks you don’t like, you can click Settings button and go to Multi-task Settings window to uncheck and remove them under Audio tab.
For those people who wish to stream Blu-ray movies to Apple TV, you can use our program to directly output 1080p Dolby Digital pass-through format that has been preset with the optimal playback settings for Apple TV 3/4, so that you can enjoy Blu-ray movies with Blu-ray lossless 5.1 surround sound on Apple TV.
Pavtube ByteCopy for Mac is pretty simple to use with a sleek and easy to navigate interface, all the most common tools can be found on the main screen. The results produced by the program are pretty high quality, the quality of the converted sound is identical to the sound on the disc. What’s more, the program is very safe and clean, it won’t try to trick you into installing adware or spyware, so just feel free to have a try at it on your new masOS High Sierra.
How to Rip Blu-ray Movies with Lossless Audio Formats Well Preserved?
Step 1: Load Blu-ray movies.
Insert the Blu-ray disc into your Mac computer’s Blu-ray drive. If your computer doesn’t ship with a drive, you will need to purchase an external USB Blu-ray drive to read on the data on Blu-ray disc. Then press “File” > “Load from disc” option on the main interface, alternatively, you can also import Blu-ray folder or Blu-ray ISO files with the program.

Step 2: Define the output format.
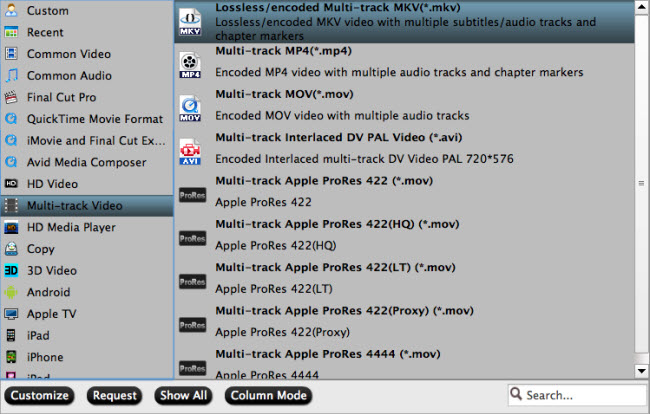
Scroll down the “Format” drop-down options, to pass through all the lossless audio formats including Dolby Digital/DTS/PCM/Dolby TrueHD/DTS-HD MA in original Blu-ray movies, it would be ideal for you to choose ” Lossless/encoded multi-track MKV(*.mkv)” under “Multi-track Video” category.

Step 3: Remove unwanted audio tracks.
Click “Settings” on the main interface to open “Multi-task Settings” window, all audio tracks from the source files are checked and to be saved in the lossless multi-track MKV container by default, if there are some audio tracks you don’t like, uncheck and remove them under the “Audio” tab.

Step 4: Begin the final ripping process.
After all setting is completed, hit the “Convert” button at the right bottom of the main interface to begin the Blu-ray lossless audio formats passing through process.
When the conversion is finished, click “Open Output Folder” icon on the main interface to open the folder with generated files. Then you can get the best digital file formats with Blu-ray lossless audio formats Dolby Digital/DTS/PCM/Dolby TrueHD/DTS-HD MA well preserved for enjoying on any devices that supports 5.1 and 7.1 surround with best sound effect.
Further Reading:
No 5.1 Dolby Audio When Connecting Apple TV to Surround Sound
Set Up ATV 4 for streaming HD videos with Dobly Digital 5.1 sounds
Rip Blu-ray Movies with 5.1 and 7.1 Audio
Rip Pure Audio Blu-ray/DVD to PonoPlayer
Blu-ray ripping- how to keep 5.1 and 7.1 audio?
Rip 4K Blu-ray with Dolby TrueHD/DTS-HD MA


