


Full Guide: Convert all video, Blu-ray, DVD discs for enjoying on portable devices
Pavtube Video Converter Ultimate is an all-in-one BD/DVD/Video solution which can convert all SD/DVD videos and rip Blu-ray, DVD contents to videos in various popular for personal use. Besides, this total media converter suite also features other practical features, like: freely select source subtitles and audio tracks, reset output file parameters, edit videos for customization, create 3D movies, etc. If you have any multimedia need, this total video converter can be your best solution and fulfill your digital entertainment.
Quick Start:
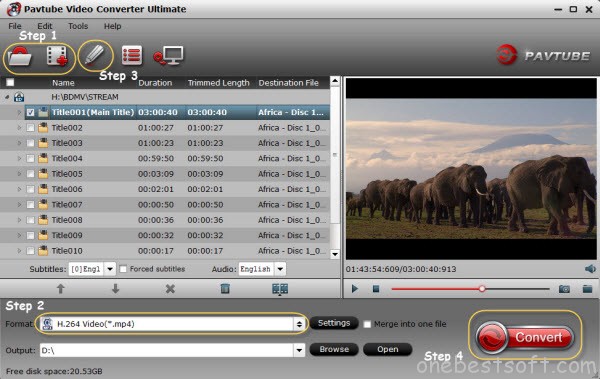
1. Import source files
Click Add Video button to import source video files, and Load file(s) button to import source Blu-ray/DVD files. You can play source files with the built-in player, take screenshots, select and preview subtitles and audio tracks. If you import source video files, you can even add external subtitles for output.
2. Choose output profile
Click Format panel to choose format for output files. You can choose the one that meets your devices or players most.
3. Specify parameters for output files
Click the settings button next to the Profile frame to specify parameters for output files. You can reset Video Codec, Quality, Video size (choose output video size from provided options, or manually input the size you desire into the box according to your devices or players), Bit Rate, Frame Rate, Aspect ratio, Audio Codec, Audio Quality, Sample rate, Channels, etc.
4. Edit video
You can click Edit button to customize output files at your own will. Video editing features provided include: Trim, Crop, Text Watermark, Image/Video Watermark, Effect, and Audio Replace.
- Trim: Allowing users to decide where to start and where to end when converting the selected clip, so that unwanted segments will be cut out after conversion.
- Crop: Getting rid of the black edges and unwanted area of the image.
- Text Watermark: Here, you can create a text watermark to personalize your video. For a text watermark, select the “Enable” box below the preview screen and type whatever text you want in the text watermark area.. You may strikeout, underline and transparent effect for the text. The font, color, size, and style of the text can be adjusted too. Click “Apply to All” to apply the settings to all the videos that are listed in file list.
- Image/ Video Watermark: Here, you can import an image or video watermark to personalize your video.
- Effect: Customize the output effect. Here, you can adjust brightness, contrast and saturation, apply gray, flip color, invert or Aged film effects and apply a number of deinterlacing options.
- Audio Editor: Adding audio to target video file so that you can replace the original audio track with favorite melody.
5. Start conversion
Back to the main interface and click the “Convert” button to convert Blu-ray/DVD/Video to various video and audio formats. You can see the converting progress, time, size, etc. Hence, you can manage your Blu-ray, DVD movies with your mulitiple devices in an easier way.