Have recorded some 4K H.265 footage with your Samsung NX1/NX500 or DJI Inspire 2/DJI Phantom 4 Pro/Phantom 4 Pro+ and wish to load them into FCP 7/X for some professional post editing workflow, the following article will show you how to get the best workflow of H.265 with FCP 7/X.

Can FCP 7/X work with H.265 codec?
From Final Cut Pro specification page, we get the information that Final Cut Pro currently does not have native editing support for H.265 footage. Therefore, to successfully import H.265 to FCP 7/X, you will need to transcode H.265 to FCP supported editing formats.
Hot Search: Play H.265 with Plex | Store H.265 on NAS | Import H.265 to Premiere
Work 4K video with FCP 7/X
Currently, only Final Cut Pro X 10.1 and later version has the capability to handle 4K video, in addition, only the following Mac models are capable of viewing 4K resolution via HDMI from Final Cut Pro X 10.1.
– Mac Pro (Late 2013)
– MacBook Pro (Retina, Late 2013 and later)
The supported 4K resolutions are as follows. Note that not every 4K monitor will support both of these resolutions, and 4096 x 2160 is only supported via HDMI at 24fps.
– 4096 x 2160
– 3840 x 2160
Best workflow of 4K H.265 with FCP 7/X
From above lists, we can see that to load 4K H.265 to FCP 7/X, you will not only need to compress 4K to 1080p but also transcode H.265 to FCP 7 editable file formats. As for working 4K H.265, what you need to do is just performing a codec transcoding process.
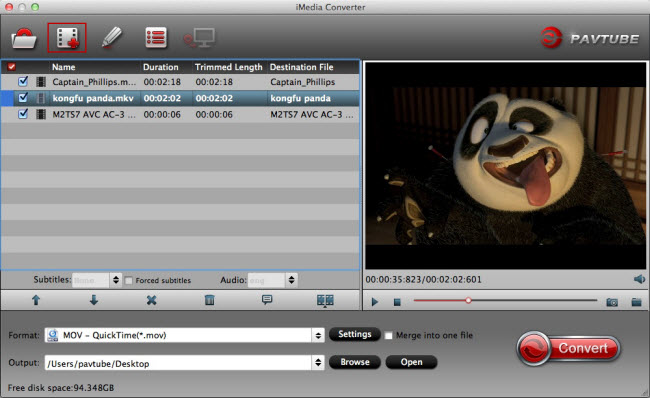
For those people who wish to get high performance and high quality post editing workflow of 4K H.265 with FCP 7/X, it would be ideal for you to encode 4K H.265 to Apple Prores codec, which provides real-time editing performance better than that of any other HD codecs in Final Cut Pro. Here, all your requirements listed above can be easily satisfied with our powerful Mac media conversion tool – Pavtube iMedia Converter for Mac. Which helps to directly generate FCP 7/X favorable Apple Prores in various different types including Apple Prores 422, Apple Prores 422 HQ, Apple Prores 422 LT and Apple Prores Proxy. Besides that, you can also use the program to compress 4K to 1080p for smooth video editing workflow on FCP 7.
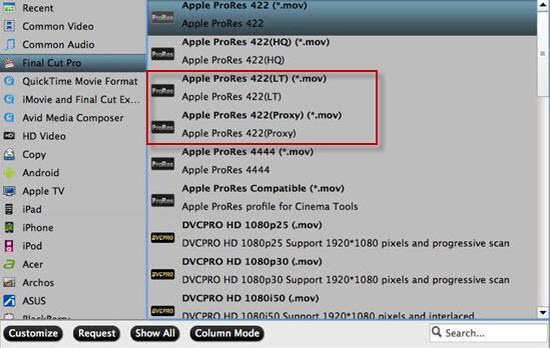
Tips: If you computer is old or slow, or you just want to do some rough editing, you can select to output “Apple Prores Proxy)(*.mov)”or “Apple Prores (LT)(*.mov)”format to save more space and bandwidth. However, if your computer are powerful enough to handle multicam and high-resolution video and you are going to do many effects editing work with FCP X, you’d better choose to output “Apple Prores 422(*.mov)”or “Apple Prores 422(HQ)(*.mov)”for better performance.
Step by Step to Compress and Transcoding H.265 for FCP 7/X Editing with Best Workflow
Step 1: Load H.265 files into the program.
You can directly drag and drop 4K H.265 files into the program or click “File” > “Add Video/Audio” or “Add from Folder” to load source H.265 files into the program.

Step 2. Choose Apple Prores as the output format.
Click “Format” bar, from its drop-down list, select your desired Prores format such as “Final Cut Pro” > “Apple Prores 422(*.mov)”or “Apple Prores 422 (HQ)” is your Mac computer is powerful enough to handle 4K resolutions video.

If your Mac computer not is powerful enough, it would be ideal for you to choose “Apple Prores 422(Proxy)” or “Apple Prores 422(LT)” format to create small resolution file size for good playback performance on slow computer.

Step 3: Compress 4K to 1080p.
Click “Settings” on the main interface to open “Profile Settings” window, under video section, click “Size(pix)”, from its drop-down list, choose 1920*1080 or 1080*720 to compress 4K to 1080p.
Step 4: Start the conversion process.
After all setting is over, go back to the main interface and hit right-bottom “Convert” button to start to convert and compress 4K H.265 video to FCP 7/X best editing formats.
When the conversion is completed, launch FCP 7/X on your Mac computer to import video to FCP for smooth editing workflow.


