


Convert your video files to reduce size without losing quality Yes It’s possible with StaxRip In this video tutorial you can find how it work. Enjoy!
NVIDIA GPUs (as well as Intel processors with built-in GPU and a motherboard with built-in Intel graphics) are capable of hardware-based video encoding and can drastically decrease encoding time.
NVIDIA NVENC : H.264 – NVIDIA CUDA capable cards (click for list) or H.265 – GeForce 900 series (Maxwell 2nd generation) or later. Click –> NVIDIA H.265 encoder information.
Intel QSVEncC: H.264 – 2nd thru 4th generation Intel processors or H.265 – 5th & 6th (+) generation Intel processors. Click –> Intel Quick Sync explained.

My setup: NVIDIA GeForce GTX950 (Purchased for $115 US):
- 2GB 128-Bit GDDR5
- Core Clock 1127 MHz
- Boost Clock 1317 MHz
- 1 x DL-DVI-I 1 x HDMI 3 x DisplayPort 1.2
- 768 CUDA Cores
- PCI Express 3.0 x16
Computer Mainboard/Processor :
- ASUS M5A97 R2.0
- AMD FX(tm)-8320 Eight-Core Processor
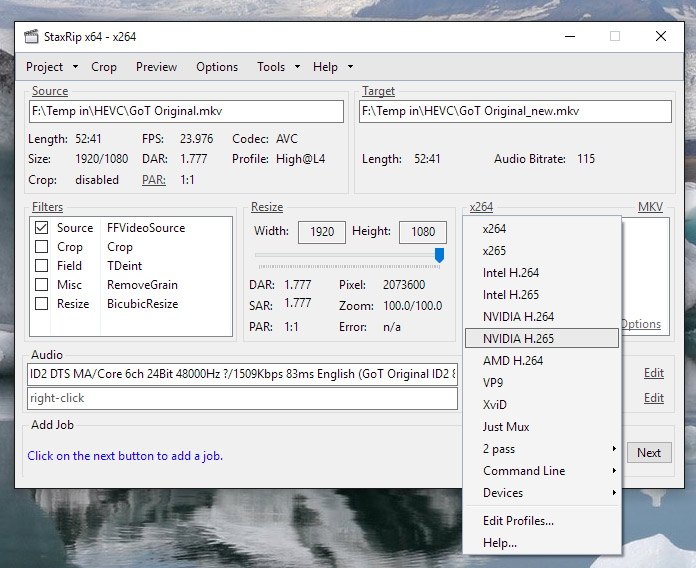
StaxRip 64 setting: NVIDIA H.265 – NVIDIA (acvuvid native).
Typical x265 HEVC encode times (approximate):
60-minute 1080p video: 8 min (compared to 1.5 hours for CPU encode).
60-minute 720p video: 3 min 30 sec (compared to 35+ min for CPU encode).
45-minute 720p video: 2 min 40 sec (compared to 30+ min for CPU encode).
1080p movie x265 HEVC encode time:
Example: Star Wars – Force Awakens (2hr 18min 21 GB BDRip original) took 3.75 hours to re-encode as x265 via CPU (Intel I7 3.5GHz). Encode using the NVIDIA GPU took 10 minutes to re-encode an equivalent quality 1080p 3 GB x265.
HEVC/H.265 is the first codec efficient enough for the high-quality HD video portion of the video-audio composite file to be smaller than an accompanying 484 Kbps 5.1 audio track.
Screen grab .x264 verses .x265 (right click – save image to your computer or open image in new tab to view full-size 1280×714).
The original 720p x264 file (with AC3 384kbps 6ch audio) is 2.65GB. The re-encoded high-quality 720p x265 file (with AC3 192kbps stereo audio) is 284MB (both files are equal duration – 1 hour). The x264 screen grab is from the original file. Even though the x265 screen grab is from an additional generation video, there is very little difference between the two images.
I actually had the time to make a how to video about this: https://www.youtube.com/watch?v=3MxdsxSyW0Y
Don’t expect any magic, I just noticed afterwards that I was way too fast when changing from step to step. Thank god the pause-button exists. Might still be a lot better than only reading a long text here. So there you go!
Original Post:
No idea if someone even remotely discussed this topic around here, but for those who didn’t just buy their new Pascal card for games, but also wanted to use it for video encoding are probably wondering how it even works without graduating from some crazy university to get things done.
Fear not, if you figured out which program to use it’s relatively simple.
- Download and unzip StaxRip to a folder of your choice
- Download the newest version of NVEnc (3.01 as of 10/11/16)
- Unzip the file to your desktop or a place of your choice and open up this folder: “NVEnc_3.01\NVEncC\x64” and copy all of the files inside
- Go to your StaxRip folder and search for a folder with the name “NVEncC” (or simply go to “pathtostaxrip\Apps\NVEncC” and overwrite all files inside
- Open up StaxRip and pick a place where the program should store its settings. (probably the best choice is the directory you are currently working in for portable reasons)
- (somewhere in the middle StaxRip asks you to install AviSynth+, just install it, it is needed for the program to properly display video streams and work with certain file formats/codecs)
- On the right side you see your preset, which is probably set to x264. Left click on it to select the NVIDIA H.265 profile.
- Double-click on “Encoder options”
- In the new window you see variables for “Constant QP” with I, P and B. Those are for the video quality. Lower settings, such as 18 on everything, are most of the time “same quality” as I call it, but with mostly bigger filesize. You may need to experiment a bit with it, but stock settings are good as they are for solid quality and filesize.
- Now to the part with 10 bit. On the left side of the window (where “Basic” is currently active), click on “Other”. After that you type “–output-depth 10” without “” into the “Custom:” field.
- You might want consider saving your profile, so you should click the little arrow that points down next to “OK” and click “Save Profile…”. Set a name and you’re good to go! (Click “OK” afterwards to leave the Encoding Options)
- Use a file of any type and drag & drop it to StaxRip (select AviSynth+ as decoder if a window pops up), select your profile, click on “Next” at the bottom right of the program window (a job gets added to the joblist) and finally, click “Start” on the “Jobs” window.
Now the program is working and will encode your video to the same folder as the source with a “_new” at the end.
Best StaxRip Alternative For Encode H.265 Videos
To fix the H.265 slow encoding issue, Pavtube studio has recently update its great media conversion tool – Pavtube Video Converter Ultimate as Top StaxRip Alternative and other Windows software with perfect support for H.265/HEVC encoding acceleration. As long as your PC are running on a CUDA-enabled Graphics card, the H.265/HEVC encoding speed of Pavtube Video Converter Ultimate can be accelerated about 30X faster than before. Refer to the step guide.
| *As a powerful H.265 encoder, decoder and converter. *Convert any video in 3840 x 2160 or 4096 x 2160 4k resolution to H.265/H.264 4K MP4, MKV, AVI, etc. *Transcode your iPhone 6S, Galaxy S7, Sony Xperia Z5/XA 4K shottings to H.265 video for uploading to YouTube/FaceBook/Vimeo. *Re-encode DJI Phantom 4, GoPro HERO 4, Canon XC10, etc 4K AVCHD, XAVC, MTS, MXF, MP4, MOV, etc. *Convert any H.265/HEVC video to edit in Windows Movie Maker, Wax, FCP, iMovie, Sony Vegas, Blender, Lightworks, etc. *Solve H.265/HEVC video playback issues on Himedia Q10 Pro, Nvidia Shield Android TV Box, Apple TV 4, Boxee, etc. *Edit simply H.265/HEVC Video such as crop, trim, merge, add watermark, rotate, effects and many more. *Transcode H.265/HEVC Video to play on iPhone 7, iPhone 6S, iPad Air 3, iPad Pro, PS4, Xbox One, Xbox 360, LG G5, Galaxy TabPro S, Galaxy Tab S2, Blackberry, Motorola, Nokia, etc. *Supports NVIDIA CUDA and ATI Stream acceleration technologies. *Backup H.265/HEVC Video to 3D SBS MP4/MKV for Gear VR, Oculus Rift DK 2, ZEISS VR One, Freely VR, PLAY VR, etc. *It can help you convert non-H.265 videos (H.264, MKV, DivX, AVI, WMV, MOV, MXF, MPG, MTS…) to H.265 files and vice versa. *What’s more, this video converter severs as a wonderful H.265 video player for you. *And with the built-in video editor, you can personalize and retouch your videos in clicks. *For Mac users, you can get Pavtube iMedia Converter for Mac (Mac OS Sierra, Mac OS X 10.11 El Capitan, Mac OS X 10.10 Yosemite, etc included ). |
Note: H.265 CUDA depends on whether your computer is geared up with H.265 encoding capable graphics card. Please refer to the document on its official website- NVIDIA Pascal GPU family.
Free Download and trail Best StaxRip Alternative For H.265:


How to Enable H.265 CUDA with Pavtube Video Converter Ultimate
Step 1. Add Source Videos
Run the best CUDA video converter program, go to the menu bar, select Add button to select the source files like MP4, AVI, WMV, MOV, etc you want to import. You can also directly drag the video files to the program for conversion. It supports batch conversion so you can import multiple files at a time.

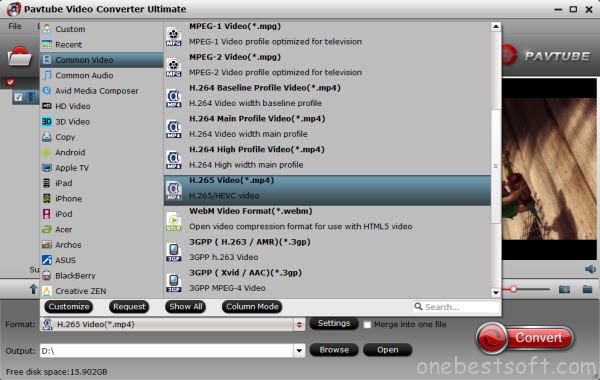
Step 2. Choose H.265 as output format
From the drop-down list of ” Format” > “Common Video”, you can select H.265 Video(*.mp4) as the target format.
Step 3. Enable GUP acceleration
Move your cursor to “Tools” button on the top of the main interface to choose “Options” and move to “Acceleration”. Then you can enable GPU acceleration.
Step 4. Start conversion
Click the Convert button to start encoding files to H.265 based on CUDA acceleration support in 30X faster conversion speed.
Read More:


